
Fun With ClamAV
Intro
I’ve started learning how to create different types of signatures in ClamAV. The signature types are fairly straight forward, but creating them in order to avoid false positives, and to provide reliable detection even when common AV bypass methods are used is not an easy task.
The bulk of what I’ll be discussing can be found here: http://www.clamav.net/doc/latest/signatures.pdf and here: http://www.clamav.net/doc/webinars/Webinar-Alain-2009-03-04.pdf
To get started, grab ClamAV: http://www.clamav.net/lang/en/download/ I’ll be running the tools under Kali Linux, and used apt-get clamav to grab them. The tools that will be used throughout this post are sigtool and clamscan.
MD5/MD5 PE Section Based Signatures
The first signature approach is taking the MD5 hash of the executable itself and setting it into this format: hash:size:name
The sigtool that will come with installing clamav will produce this format for you of a given executable. While looking for a piece of malware to mess with I came across this dealio: http://www.exploit-db.com/exploits/25912 so compiled it, and used this throughout my testing.
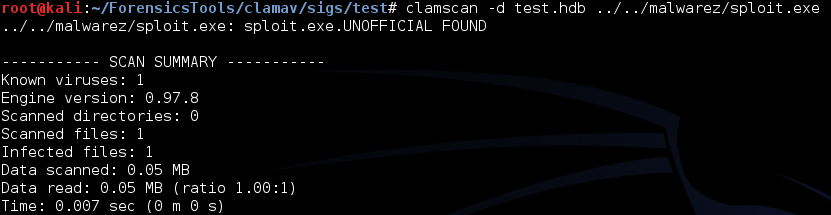
Here’s an example (Signatures have to be stored in .hdb files for this sig format):

Then we can use that bad boy in an hdb file and scan for that signature in a target exe:
Now that’s great, but as you can guess an MD5 signature isn’t extremely practical considering a single small change within the source code. For example, the following:

The text is very similar in many ways, and as you can see results in completely different signatures. This is due to the fact that the creators of MD5 created this hash function to be cryptographically sound and to provide a unique checksum in which similarities between the input and output data could not be seen (confusion & diffusion). The result being that their use in antivirus detection could be easily bypassed with a small amount of changes to the binary in question.
PE Section Based Signatures
What next? Well, we could break the PE into its respectable sections, and grab an MD5 from each of those. This is known as PE Section Based signatures. In order to grab those sections I came across this handy dandy script: http://hexacorn.com/d/PESectionExtractor.pl
Here’s it in action:
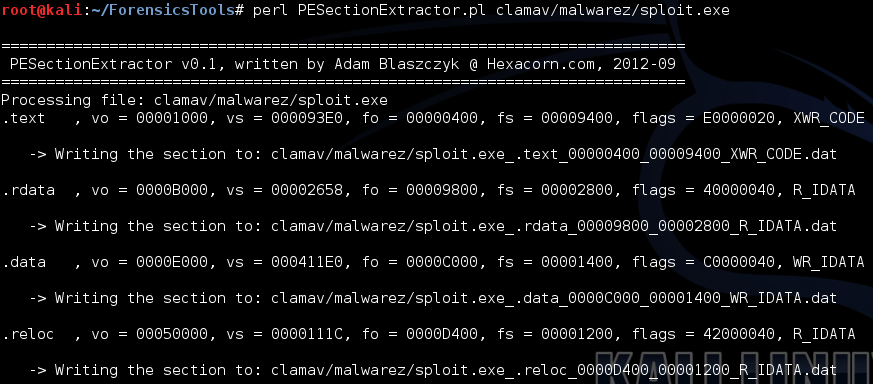
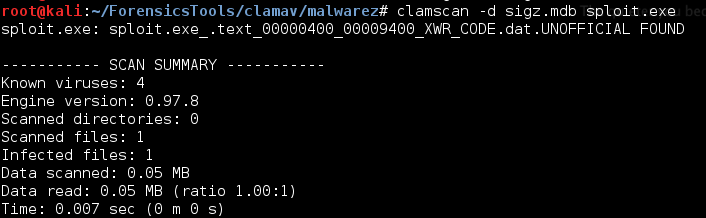
The resulting sections can then be added to a .mdb file with the following command:

Which can then be used in a scan:
Body-Based Signatures
Okay, now things start to get really interesting. What if we started looking at the body of what we want to detect? Well, then our only limitation is essentially the body itself. All data in body based signatures is represented in hex. You can use the --hex-dump flag in sigtool for converting strings.
There’s a number of ways to get hex from a binary file, I’ll be using IDA to grab instructions and strings through the hex view.
Basic Signature Format
This is the most basic format for signatures in .db files:
Malware_Name=Hex
Extended Signature Format
I won’t be listing all of the functions of this format here since they can be found in the clamav manual but here’s a demonstration of using strings from the compiled exploit:

Then grabbed the hex representation from IDA:

The format for this signature is:
MalwareName:TargetType:Offset:HexSignature[:MinFL:[MaxFL]]
You specify a name for the malware, the target type will be anything from binary to HTML represented by an integer, the offset into the file (EOF+bytes, EP+bytes etc…), the hex sig to match, and floating offsets give you some breathing room to match on (see the documentation for further details).
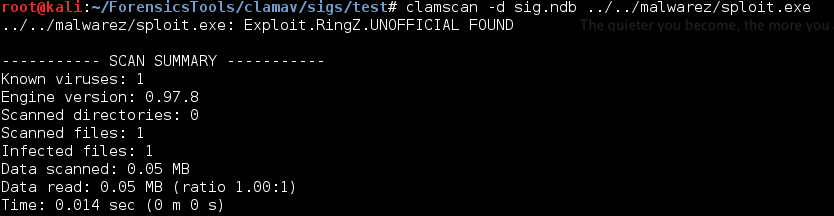
So if we want to match on that string, we can make a signature like this:
Exploit.RingZ:1:*:4E6F206C75636B2C2072756E20657870
And do a scan:
Cool, lets get a bit more dynamic:
Match --- Windows NT/ then match on anything *, then match on our previous string to match:
Exploit.RingZ:1:*:2D2D2D0A0D57696E646F7773204E542F*4E6F206C75636B2C2072756E20657870
Byte range between strings: Exploit.RingZ2:1:*:324B382F372F38{1-9}206C6F63616C2072696E673020657870
These are some basic examples, but these could be bypassed simply by modifying the strings prior to compiling or editing the binary itself. Ideally you would want to match on a critical component of the binary, that woud be unique to the binary itself in order to not generate false positives.
Where things start to get even more complex are with logical signatures, which allow further flexibility.
Logical Signatures
You can use logical expressions with sub-signatures to make even more powerful matches. These signatures are formatted like so:
SignatureName;TargetDescriptionBlock;LogicalExpression;Subsig0;
Subsig1;Subsig2;...SubsigN
Logical expressions involve common operators as seen in programming languages, and adhere to the supplied Subsigs. I’ve combined the two signatures already specified into a logical signature that requires both of the signatures to be positive in order to declare a file as being infected with the & operand:
Exploit.RingZ;Target:0;(0&1);2D2D2D0A0D57696E646F7773204E542F*4E6F206C75636B2C2072756E20657870;324B382F372F38{1-9}206C6F63616C2072696E673020657870
This would then be stored in a .ldb file to be used in scans.
There’s a Lot More to This
Well, I’ve scratched the surface of creating a number of different types of signatures in ClamAV, but there’s a number of other signature formats to expand on and ways to expand those mentioned accordingly. Now that you’ve got a taste go take a read over the documentation and start writing some yourself!
Cheers,
~Josh